
Concrete is one of the hardest materials you will ever drill into — and using the wrong drill is not just ineffective, it destroys drill bits and burns out motors within minutes. The question of what type of drill for concrete comes down to one decision: how much impact energy does your application require?
Standard concrete drilling for anchor holes, shelf brackets, and light fixture mounting requires a hammer drill or SDS rotary hammer. Reinforced concrete, large-diameter holes, and high-volume drilling demand an SDS rotary hammer with appropriate tooling. A standard drill without hammer function will not penetrate concrete in any practical sense.
This guide covers every drill type, every bit option, and the complete step-by-step drilling technique — so you get clean, correctly sized holes without cracking the concrete or destroying your equipment. Read this OSHA Silica Standard
For anchor selection after drilling, see our complete guide on types of concrete anchors — which covers wedge, sleeve, drop-in, and epoxy anchors for every application. For structural bolt installations, see types of anchor bolts for concrete.
Table of Contents
- Can You Use a Regular Drill for Concrete?
- What Type of Drill for Concrete — The 3 Main Options
- Hammer Drill vs Rotary Hammer — Full Comparison
- SDS-Plus vs SDS-Max
- Cordless vs Corded Drill for Concrete
- What Drill Bit for Concrete?
- How to Drill Into Concrete — Step by Step
- Drilling Into Different Concrete Types
- Common Drilling Mistakes to Avoid
- Safety Equipment for Concrete Drilling
- Frequently Asked Questions
Can You Use a Regular Drill for Concrete?
No — not in any practical sense.
A standard drill (also called a drill/driver) spins the bit but produces no impact force. Concrete is too hard for rotation alone to penetrate. You can press a standard drill against concrete indefinitely and produce nothing but a polished spot and a burnt-out bit.
The minimum requirement for concrete drilling is a hammer drill — a tool that combines rotation with a rapid hammering action that chips and crushes the concrete as the bit spins.
The only exception: a diamond core bit on a standard drill can cut through concrete using water cooling and slow rotation — but this is a specialty technique for tile and small-diameter core holes, not general concrete anchor drilling.
What Type of Drill for Concrete — The 3 Main Options
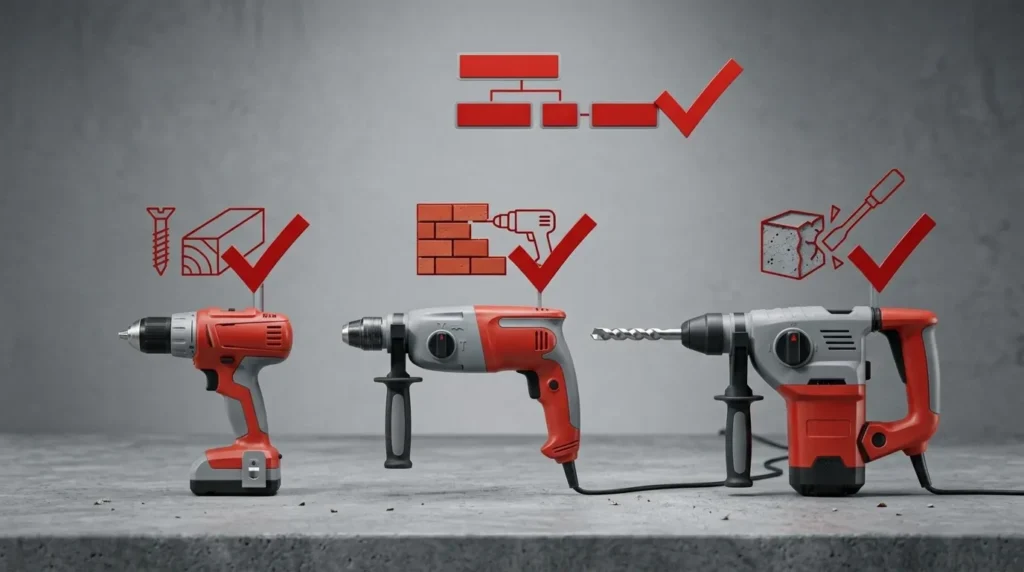
Standard Drill (No Hammer Function)
Verdict for concrete: Do not use.
A standard drill/driver spins at high RPM with no impact mechanism. It will not drill concrete — it will overheat the bit and potentially damage the motor within seconds of contact with hard concrete.
The only exception: Diamond core bits with water cooling on a standard drill can cut through concrete tiles and thin slabs for plumbing and electrical penetrations — but this is a controlled, slow technique requiring continuous water supply and is not suitable for anchor hole drilling.
Hammer Drill
A hammer drill adds a rapid hammering action to standard drill rotation — produced by two ribbed discs that ride over each other as the chuck rotates, creating a forward-backward percussion motion.
How fast does it hammer? A typical hammer drill produces 0–48,000 BPM (beats per minute) — but each impact delivers only 0.5–1.5 joules of energy. This is adequate for light concrete drilling but limited for hard or reinforced concrete.
Best applications for hammer drill:
- Anchor holes under 3/4 inch diameter in standard residential concrete
- Light masonry, brick, and concrete block
- Occasional drilling — not high-volume professional use
- Budget-conscious DIY projects (hammer drills cost $50–$150)
Limitation: The mechanical hammering mechanism in a hammer drill is significantly less powerful than the pneumatic piston system in a rotary hammer. For the same hole size, a rotary hammer drills 3–5× faster and with far less effort.
Rotary Hammer (SDS Drill)
The rotary hammer uses a pneumatic piston mechanism — an electric motor drives a piston that compresses air, which drives a ram, which strikes the drill bit. This produces far higher impact energy than any mechanical hammer drill.
Impact energy: 1.5–8+ joules depending on model size — 3–10× more than a hammer drill.
The result: A rotary hammer drills concrete faster, with less pressure required from the operator, and with significantly longer bit life than a hammer drill at equivalent applications.
Best applications for rotary hammer:
- Any hole over 3/4 inch diameter
- Reinforced concrete (hitting rebar is less likely to stall the tool)
- High-volume drilling — multiple holes per day
- Hard concrete (high-strength, old, or aggregate-heavy mixes)
- Chiseling and demolition (rotary hammers have a chisel-only mode)
- Professional and trade use
Hammer Drill vs Rotary Hammer — Full Comparison
How Each Works
| Feature | Hammer Drill | Rotary Hammer |
|---|---|---|
| Impact mechanism | Mechanical (ribbed discs) | Pneumatic piston |
| Impact energy | 0.5–1.5 joules | 1.5–8+ joules |
| BPM range | 0–48,000 | 0–4,500 |
| Drilling speed in concrete | Slow | Fast (3–5× faster) |
| Operator effort required | High | Low |
| Bit life | Shorter | Longer |
| Chuck type | Standard keyless | SDS-plus or SDS-max |
| Chisel mode | No | Yes (most models) |
| Weight | 3–5 lbs | 5–12 lbs |
| Cost | $50–$200 | $150–$600+ |
| Best for | Light residential | Professional, heavy residential |
Impact Energy and BPM
The key number is impact energy in joules — not BPM. A hammer drill at 48,000 BPM delivering 0.5 joules per blow moves far less concrete than a rotary hammer at 4,500 BPM delivering 4 joules per blow.
Total energy delivered per second:
- Hammer drill: 48,000 BPM × 0.5 joules ÷ 60 = 400 joules/second
- Rotary hammer: 4,500 BPM × 4 joules ÷ 60 = 300 joules/second
The numbers are closer than expected — but the rotary hammer’s higher energy per blow means each impact penetrates further per strike. The result is faster, cleaner hole progress with far less operator fatigue.
Chuck System — Standard vs SDS
Standard keyless chuck: Used on hammer drills. Accepts standard round-shank bits. The chuck must grip the bit tightly — slip under heavy load is a risk.
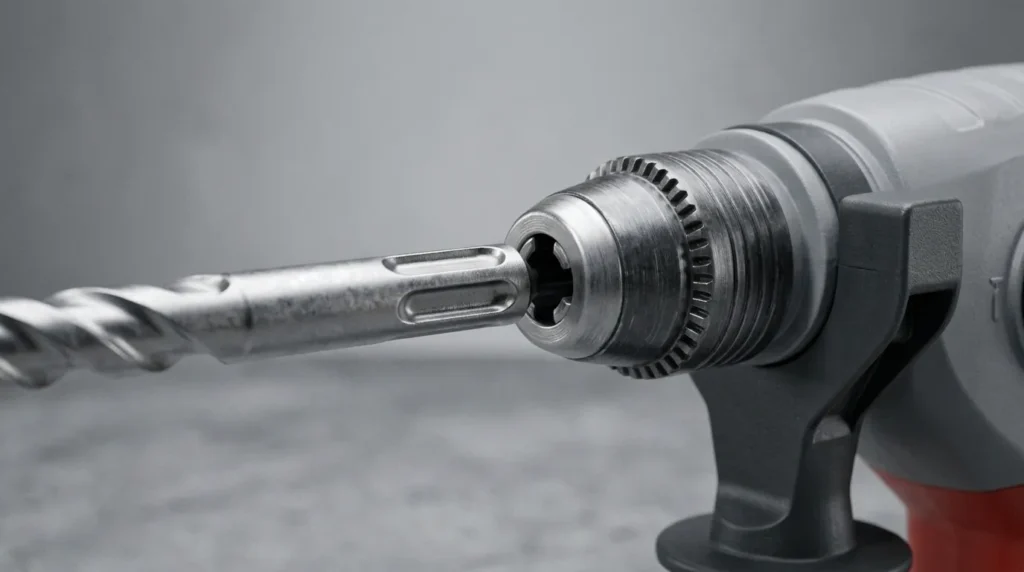
SDS-plus chuck: The SDS (Slotted Drive System) bit has slots that lock into the chuck — the bit can slide slightly in and out (allowing the hammering action) while being locked against rotation. This is why SDS bits drill faster — the bit movement contributes to the hammering rather than fighting against chuck grip.
SDS-max chuck: A larger SDS system for heavy-duty rotary hammers — used for bits over 3/4 inch diameter and demolition chisels. Incompatible with SDS-plus bits.
Important: Never use a standard round-shank bit in an SDS chuck with an adapter for heavy concrete drilling — the bit can work loose under impact load.
SDS-Plus vs SDS-Max — What Is the Difference?
| Feature | SDS-Plus | SDS-Max |
|---|---|---|
| Shank diameter | 10mm | 18mm |
| Max recommended bit diameter | 1.5 inches | 2.5+ inches |
| Impact energy range | 1.5–5 joules | 5–20+ joules |
| Tool weight | 5–8 lbs | 8–15+ lbs |
| Best for | Standard residential + commercial | Heavy commercial, demolition |
| Compatibility | SDS-plus bits only | SDS-max bits only |
| Cost range | $150–$400 | $300–$800+ |
For residential DIY and light commercial work: SDS-plus is the correct choice — covers holes up to 1.5 inches diameter in standard and lightly reinforced concrete.
For heavy commercial, large anchor installations, and demolition: SDS-max provides the power needed for holes above 1.5 inches and sustained high-volume drilling.
Worked Example — Choosing Between SDS-Plus and SDS-Max: Installing 16 wedge anchors, 3/4-inch diameter, in a concrete warehouse floor. Hole depth: 4.5 inches.
SDS-plus rotary hammer with a 3/4-inch SDS carbide bit: drills each hole in approximately 25–35 seconds = 16 holes in under 10 minutes. ✅ Correct tool for this application.
SDS-max would be overkill — more weight, more cost, no speed advantage at 3/4-inch diameter.
Cordless vs Corded Drill for Concrete
Both work — with trade-offs.
| Factor | Cordless | Corded |
|---|---|---|
| Power | 18V–60V (improving rapidly) | Consistent, unlimited |
| Mobility | High — no cord | Limited by cord length |
| Sustained performance | Drops as battery depletes | Constant |
| Best for | Occasional drilling, site mobility | High-volume, sustained drilling |
| Battery life per charge | 30–80 holes (3/4″ anchors) | Unlimited |
| Weight | Heavier (battery) | Lighter body |
Modern 18V and 36V cordless rotary hammers are now powerful enough for most residential and light commercial concrete drilling — the gap with corded tools has narrowed significantly.
Recommendation:
- DIY homeowner drilling 10–20 anchor holes: cordless SDS-plus is convenient and adequate
- Contractor drilling 50+ holes per day: corded SDS-plus or SDS-max for sustained performance
- Remote sites without power: cordless is the only option
What Drill Bit for Concrete?
The drill is only half the equation — the bit determines how fast you penetrate and how long the tooling lasts.
Carbide-Tipped Masonry Bits
Standard carbide-tipped masonry bits have a tungsten carbide tip brazed onto a steel shank. They fit standard keyless chucks and work with hammer drills.
Best for: Light concrete drilling, brick, block, and mortar. Adequate for occasional anchor hole drilling in residential concrete.
Limitation: The brazed carbide tip is the weak point — it can dislodge under heavy impact. Not suitable for SDS rotary hammer use (use SDS carbide bits instead).
Cost: $3–$15 per bit depending on diameter.
SDS Carbide Bits
SDS carbide bits have a full tungsten carbide flute ground into the bit — not just a brazed tip. The SDS shank slots into the rotary hammer chuck. The result is dramatically longer bit life and faster penetration than carbide-tipped masonry bits.
Best for: Any rotary hammer application — anchor holes in standard and reinforced concrete, brick, block.
Cost: $8–$30 per bit. More expensive upfront, but significantly lower cost per hole than standard masonry bits used with a hammer drill.
Diamond Core Bits
Diamond core bits cut cylindrical holes — used for large-diameter penetrations for plumbing, electrical conduit, HVAC, and post-installed anchors requiring large hole diameters.
Wet vs dry core bits:
- Wet core bits: Used with water cooling — longer life, cleaner cuts. Require water supply and drainage management.
- Dry core bits: Used without water, with dust extraction — more convenient but shorter bit life.
Cost: $30–$200+ depending on diameter.
Bit Size Guide for Common Anchor Types
| Anchor Type | Anchor Diameter | Required Hole Diameter | Bit Type |
|---|---|---|---|
| Concrete screw (Tapcon) | 3/16″ | 5/32″ | Carbide masonry |
| Concrete screw (Tapcon) | 1/4″ | 3/16″ | Carbide masonry |
| Wedge anchor | 3/8″ | 3/8″ | SDS carbide |
| Wedge anchor | 1/2″ | 1/2″ | SDS carbide |
| Wedge anchor | 5/8″ | 5/8″ | SDS carbide |
| Wedge anchor | 3/4″ | 3/4″ | SDS carbide |
| Sleeve anchor | 1/2″ | 1/2″ | SDS carbide |
| Drop-in anchor | 1/2″ | 1/2″ | SDS carbide |
| Epoxy anchor (threaded rod) | 1/2″ rod | 5/8″ | SDS carbide |
| Epoxy anchor (threaded rod) | 3/4″ rod | 7/8″ | SDS carbide |
| Core hole (conduit) | 1″ conduit | 1.5″ | Diamond core |
Always verify hole diameter against anchor manufacturer specification — tolerances are tight and an oversized hole reduces anchor capacity significantly.
How to Drill Into Concrete — Step by Step
Step 1 — Check for Rebar
Before drilling any hole in reinforced concrete — walls, columns, elevated slabs, foundations — scan for rebar with a rebar scanner (cover meter or ferromagnetic detector).
Drilling into rebar does not just damage the bit — it can damage the structural integrity of the element and creates a short-circuit risk near electrical systems. If your scanner detects rebar at your intended location, move the hole position minimum 2 inches in any direction and re-scan.
Rebar scanner cost: $50–$300 for basic models. Rental available at most tool rental stores for approximately $30–$50/day.
Step 2 — Mark and Start the Hole
Mark your hole location with a pencil or chalk mark. For precise positioning — anchor bolt patterns, fixture mounting — use a center punch to create a small indent that prevents the bit from wandering at startup.
Starting technique: Begin drilling at low speed with no hammer function (if your drill has this option) to establish the hole position. Once the bit has created a small starter hole (approximately 1/4 inch deep), switch to full hammer mode and full speed.
Step 3 — Drill Technique
Correct technique:
- Hold the drill perpendicular to the surface — angled holes create problems for anchors
- Apply steady, moderate pressure — let the tool do the work
- Withdraw the bit every 30–60 seconds to clear dust from the hole
- Do not force the drill — excessive pressure overheats the bit and can crack the concrete around the hole
If the bit stops penetrating: The bit has likely hit an aggregate (hard stone) particle. Apply slight side pressure while maintaining forward pressure — this helps the carbide tip find a grinding edge on the aggregate rather than riding on its smooth face.
Worked Example — 1/2-inch Wedge Anchor Hole: Drilling a 1/2-inch hole, 4 inches deep in 4,000 PSI residential concrete. SDS-plus rotary hammer, 1/2-inch SDS carbide bit.
- Mark location, center punch
- Start at low speed — establish 1/4-inch starter hole (5 seconds)
- Switch to hammer mode, full speed
- Drill to depth — approximately 20–30 seconds
- Withdraw bit every 15 seconds to clear dust
- Blow hole clean with compressed air or blow pump
Total time per hole: approximately 45–60 seconds including setup. 16 holes: approximately 15 minutes.
Step 4 — Clean the Hole
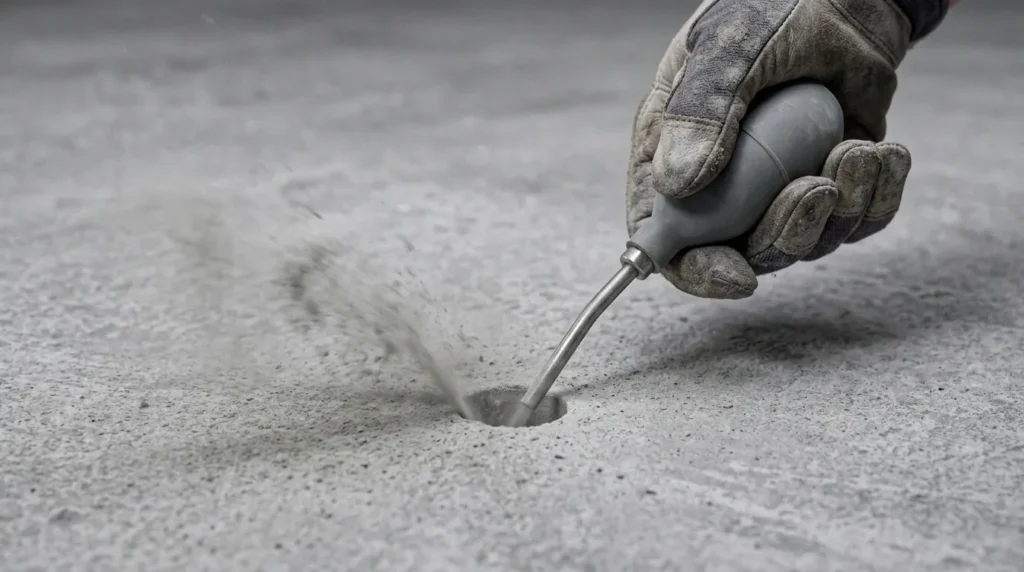
Hole cleaning is not optional — it is critical for adhesive anchor performance and important for mechanical anchor function.
For mechanical anchors (wedge, sleeve): Blow dust from the hole with compressed air or a blow pump. Brush the hole sides to remove loose material.
For epoxy/adhesive anchors: The hole must be cleaned thoroughly:
- Brush the hole with a wire brush matching the hole diameter — 3 complete passes
- Blow with compressed air or blow pump — 3 passes
- Repeat: brush 3×, blow 3×
- Hole must be dust-free before injecting epoxy
Dust in an epoxy anchor hole reduces bond strength by 30–50%. This is the most common cause of adhesive anchor failure.
Drilling Into Different Concrete Types
Standard Residential Concrete
3,000–4,000 PSI, typically 4–6 inches thick. The most common drilling application.
Recommended tool: SDS-plus rotary hammer for any hole 1/2 inch or larger. Hammer drill acceptable for holes under 3/8 inch in occasional use.
Bit life: SDS carbide bits typically last 50–200 holes at standard diameters in residential concrete — depending on aggregate hardness.
Reinforced Concrete
Contains rebar — always scan before drilling. If rebar cannot be avoided, use a rebar-cutting bit (special carbide or diamond bit designed to cut both concrete and steel).
Tool requirement: SDS-plus or SDS-max rotary hammer — the impact energy is needed to push through the harder transition zones around aggregate and any rebar contact.
Old or Hard Concrete
Concrete hardens progressively over decades — 50-year-old concrete can be significantly harder than a fresh pour at the same PSI specification. Hard aggregate (granite, basalt, quartzite) also slows penetration.
Signs of hard concrete: Bit progress is slow even at full power, bit tip dulls quickly, drilling produces sparks rather than dust.
Solution: Use a premium SDS carbide bit with a fresh, sharp tip. Consider upgrading to an SDS-max tool if an SDS-plus is struggling. Wet diamond core bits cut through any hardness level.
Brick and Block
Brick and concrete block are softer than solid concrete — a hammer drill is often adequate for standard anchor holes in these materials.
Caution: Hollow concrete block (CMU) has thin face shells — aggressive drilling can crack the face shell. Use moderate pressure and slow speed when approaching the expected void zone.
Common Drilling Mistakes to Avoid
Mistake 1 — Using a standard drill in concrete. It will not work and will damage the motor. Always use a hammer drill or rotary hammer for concrete.
Mistake 2 — Wrong hole diameter. Anchor hole diameter must match the anchor specification exactly. An oversized hole (even 1/16 inch) reduces mechanical anchor capacity by 20–40% and prevents proper expansion. Always check the anchor manufacturer’s required hole diameter before drilling.
Mistake 3 — Drilling without scanning for rebar. In any reinforced concrete element — walls, columns, elevated slabs, foundations — scan before drilling. Hitting rebar damages bits, can damage the structure, and near electrical systems creates shock risk.
Mistake 4 — Skipping hole cleaning for epoxy anchors. Dust contamination is the primary cause of adhesive anchor failure. Brush and blow thoroughly — minimum three passes each. Never inject epoxy into a dusty hole.
Mistake 5 — Applying too much pressure. Forcing the drill does not make it faster — it overheats the bit, can cause the concrete to crack around the hole, and tires the operator. Steady moderate pressure with the tool doing the work produces faster, cleaner holes.
Mistake 6 — Drilling at an angle. Angled holes create problems for anchor installation and reduce anchor capacity. Use a drill guide or level bubble (built into many rotary hammers) to ensure perpendicular drilling.
Safety Equipment for Concrete Drilling
| Equipment | Why Needed | Standard |
|---|---|---|
| Safety glasses / goggles | Concrete chips, dust | ANSI Z87.1 |
| N95 or P100 respirator | Silica dust from drilling | NIOSH approved |
| Hearing protection | Rotary hammer noise (90–105 dB) | ANSI S3.19 |
| Dust extraction vacuum | Silica control — OSHA required | HEPA filter |
| Anti-vibration gloves | Reduce hand-arm vibration | EN ISO 10819 |
| Rebar scanner | Prevent structural damage | — |
Silica dust — the critical hazard: Drilling concrete generates respirable crystalline silica — the same hazard as cutting and grinding. A dust extraction vacuum attached to the drill or a wet-drilling setup is required for OSHA compliance on commercial sites. For residential DIY work, an N95 respirator is minimum protection — a P100 half-face respirator provides better protection during extended drilling.
Frequently Asked Questions
What type of drill do I need for concrete?
A hammer drill for light applications — anchor holes under 3/4 inch in standard residential concrete. A rotary hammer (SDS-plus) for any hole over 3/4 inch, reinforced concrete, hard concrete, or high-volume drilling. Never use a standard drill without hammer function — it will not penetrate concrete.
What is the difference between a hammer drill and a rotary hammer?
A hammer drill produces hammering via two mechanical ribbed discs — delivering 0.5–1.5 joules per impact. A rotary hammer uses a pneumatic piston — delivering 1.5–8+ joules per impact. The rotary hammer is 3–5× faster in concrete, significantly reduces operator effort, accepts SDS bits (which last longer), and has a chisel mode. For any serious concrete drilling, a rotary hammer is the correct choice.
Can a cordless drill go through concrete?
Only if it has a hammer function. Modern 18V and 36V cordless rotary hammers are powerful enough for most residential concrete drilling. A standard cordless drill/driver without hammer function will not drill concrete effectively.
What drill bit should I use for concrete?
For hammer drills: carbide-tipped masonry bits in standard round shank. For rotary hammers: SDS carbide bits — they last significantly longer and drill faster than standard masonry bits. For large-diameter holes: diamond core bits (wet or dry). Always match the bit diameter to the anchor manufacturer’s specified hole size.
How do I drill into concrete without cracking it?
Use steady moderate pressure — never force the drill. Start at low speed to establish the hole position before going to full speed. Withdraw the bit regularly to clear dust. Keep the drill perpendicular to the surface. Avoid drilling too close to edges — minimum edge distance of 6× anchor diameter from any concrete edge.
What size drill bit do I need for concrete anchors?
It depends on the anchor type and size. For a 1/2-inch wedge anchor: a 1/2-inch bit. For a 1/2-inch threaded rod epoxy anchor: a 5/8-inch bit (epoxy anchors need a slightly oversized hole for adhesive fill). Always verify hole diameter against the anchor manufacturer’s specification — the hole size is critical for anchor performance.
Do I need a special drill for reinforced concrete?
Yes — always use a rotary hammer (SDS-plus or SDS-max) for reinforced concrete. The higher impact energy handles the harder transition zones around aggregate and any contact with rebar. Also scan for rebar before drilling with a rebar scanner to avoid structural damage and bit destruction.
What RPM should I use for drilling concrete?
Lower RPM with high impact energy is the correct setting for concrete. Most rotary hammers are preset for concrete mode — high impact, moderate rotation. For carbide bits in concrete, 300–600 RPM with full hammer mode is typical. Higher RPM without adequate impact causes overheating rather than penetration.
Conclusion
The right drill for concrete is determined by hole size and frequency. A hammer drill handles light residential anchor drilling under 3/4 inch. An SDS-plus rotary hammer handles everything from 3/4 inch upward, all reinforced concrete, and any professional application. The bit matters as much as the drill — always use SDS carbide bits in a rotary hammer and size the hole precisely to the anchor specification. Clean the hole thoroughly before installing any adhesive anchor. For the anchors themselves, see our complete selection guides on types of concrete anchors and types of anchor bolts for concrete — everything you need from the hole to the finished connection.