
Concrete finishing is a sequence, not a single step. Before any trowel touches the surface, before any texture is applied, before any sealer is planned — the concrete must be flat. Not approximately flat. Not flat-enough. Genuinely flat, to the level tolerance the finished surface requires. A floor that will receive polished concrete or large-format tiles needs to be flat to within 1/8 inch over 10 feet. A residential driveway needs to be flat enough that water drains rather than pools. A warehouse floor needs to be flat enough for forklift operation.
The concrete flattener tool is the category of equipment that achieves this flatness — from a simple 2×4 dragged across screed rails, to a laser-guided self-propelled machine that levels a 50,000 sq ft warehouse floor to within 1/16 inch. The right tool depends on the scale of the project, the flatness tolerance required, and whether you are a homeowner doing one driveway or a contractor producing commercial floors weekly.
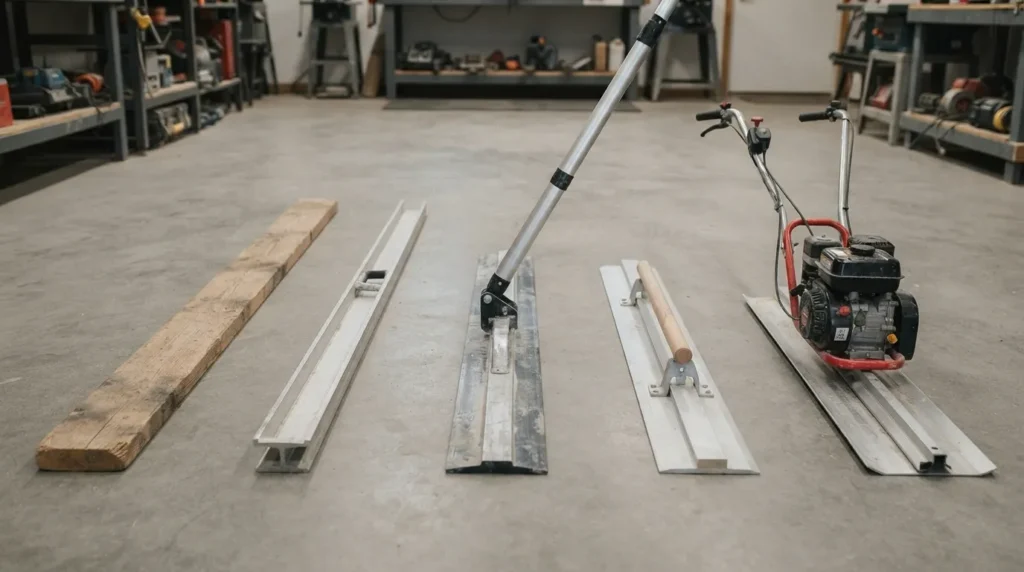
This guide covers every concrete flattener tool type — screed boards, aluminum screeds, vibrating screeds, bull floats, darbies, power screeds, and laser screeds — with specifications, selection guidance, step-by-step technique, and the application context that determines which tool is right for each pour.
For concrete volume calculations before any pour, use the free concrete calculator at ConcreteCal. For guidance on the finishing tools that follow flattening, see our types of trowels for concrete guide.
Table of Contents
- What Is a Concrete Flattener Tool and Why Does It Matter?
- Types of Concrete Flattener Tools
- Screed — The Primary Concrete Flattener Tool
- Bull Float — Flattening After Screeding
- Darby — Hand Flattening for Small Areas
- Hand Screed and Fresno — Extended Reach Tools
- Power Screed — Mechanical Concrete Flattener
- Laser Screed — Professional Grade Concrete Leveling
- Concrete Flattener Tool Comparison Table
- How to Flatten Concrete — Step by Step
- Concrete Flattener Tool by Application
- Frequently Asked Questions
What Is a Concrete Flattener Tool and Why Does It Matter?
A concrete flattener tool is any instrument used to level fresh concrete to a uniform, flat surface immediately after placement and consolidation. The tool rides on screed rails, form edges, or existing concrete while the operator moves it across the surface — cutting off high spots and filling low spots to produce a consistent finished elevation.
Flattening vs Finishing — The Critical Difference
These two terms describe sequential operations on the same concrete surface — but they use different tools and serve completely different purposes.
Flattening brings the concrete surface to the correct elevation and removes major surface irregularities. It happens immediately after concrete placement while the mix is still plastic — within the first 20–40 minutes of pour. A flattening tool moves concrete from high spots to low spots, producing a surface that is level (or at the correct slope) and free of major ridges.
Finishing closes the surface paste, creates texture, and prepares the concrete for its final appearance. It happens after bleeding water has evaporated and the concrete has partially stiffened — typically 30 minutes to several hours after placement depending on temperature and mix design. Finishing tools (trowels, brooms, stamps) work the surface paste without moving significant volumes of concrete.
Getting the sequence wrong is one of the most common concrete mistakes. Finishing a surface that has not been properly flattened locks in elevation errors permanently — no amount of troweling will move the concrete enough to correct a bump or depression once it has begun to stiffen.
When You Need a Flattener vs When You Need a Trowel
| Operation | Tool | When | Purpose |
|---|---|---|---|
| Screeding | Screed board, aluminum screed | Immediately after placement | Cut to correct elevation |
| Floating | Bull float, darby | After screeding, before bleed | Close surface, embed aggregate |
| Finishing | Steel trowel, fresno | After bleed water | Compact surface paste |
| Texturing | Broom, stamp, brush | Before final set | Apply surface texture |
This guide focuses on the first two operations — screeding and floating — where concrete flattener tools are used.
Types of Concrete Flattener Tools
Six main tool categories cover the concrete flattening task from smallest residential pour to largest industrial slab:
| Tool | Operation | Scale | Skill Level |
|---|---|---|---|
| Screed board (2×4) | Screeding | Small residential | Beginner |
| Aluminum screed bar | Screeding | Residential-commercial | Beginner-intermediate |
| Vibrating screed | Screeding | Commercial slabs | Intermediate |
| Roller screed | Screeding | Medium-large slabs | Intermediate |
| Bull float | Floating | All scales | Beginner |
| Darby | Floating | Small areas, edges | Intermediate |
| Hand screed/fresno | Floating/finishing | All scales | Intermediate |
| Power screed | Screeding | Commercial | Professional |
| Laser screed | Screeding | Large commercial | Professional |
Screed — The Primary Concrete Flattener Tool
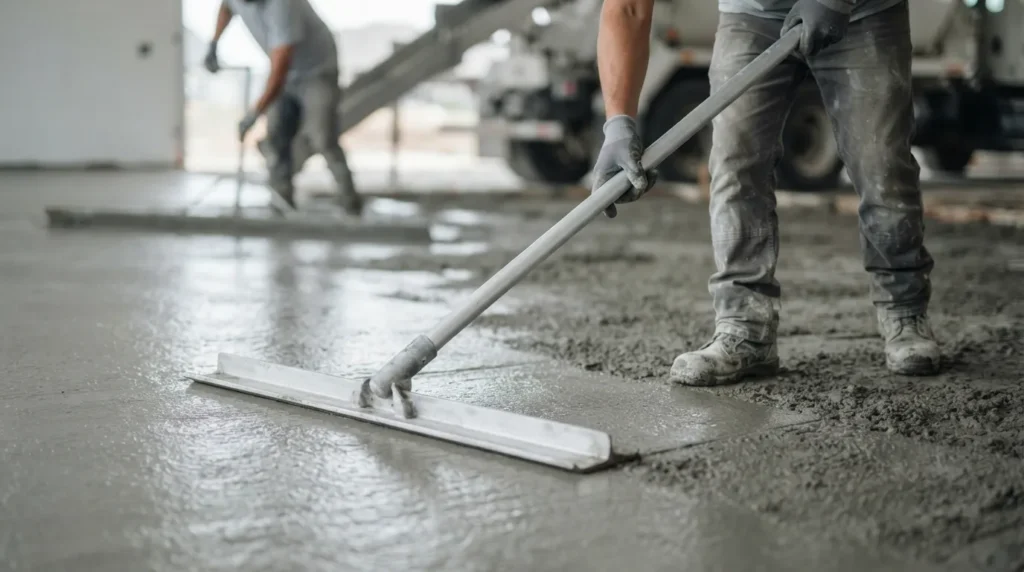
Screeding is the first flattening operation — it establishes the finished surface elevation by cutting the concrete surface to match the height of screed rails or form edges. Everything else in concrete flattening is either a preparation for screeding or a refinement after it.
Straight Edge Screed (2×4 Board Screed)
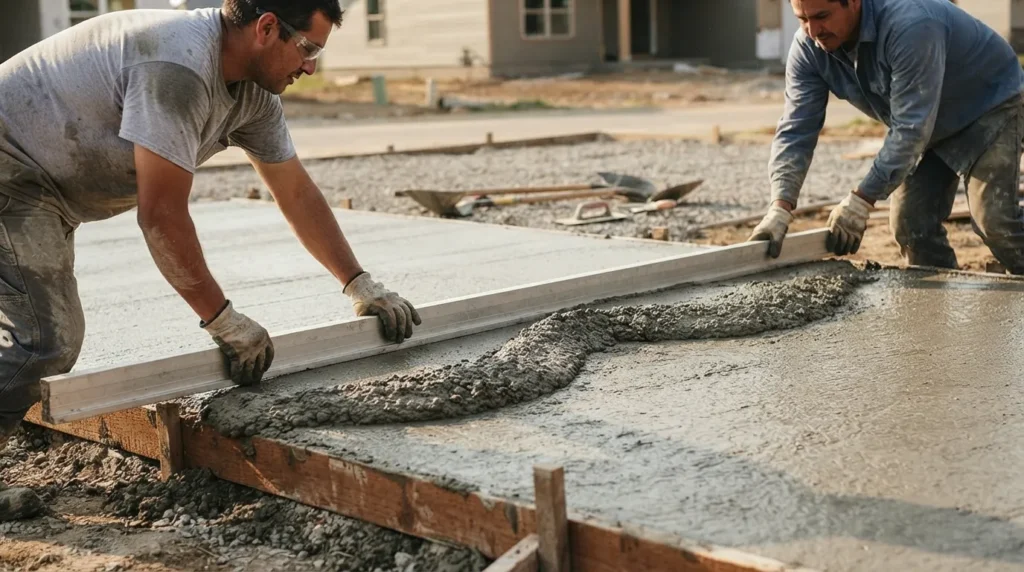
The simplest concrete flattener tool in existence is a straight piece of 2×4 lumber dragged across the surface of a fresh concrete pour. The ends ride on form boards or screed rails that are set at the finished slab elevation — the 2×4 cuts the concrete surface to that elevation.
Advantages:
- Zero cost — material is already on every construction site
- Works immediately, no setup beyond setting screed rails
- Appropriate for slabs under 8–10 feet wide (maximum practical 2×4 screed length)
Technique: Two people, one at each end of the screed board, move it forward in a sawing motion — slightly left and right while advancing. The sawing motion cuts high spots and works concrete into low spots more effectively than a straight pull. Excess concrete in front of the screed is pushed forward and removed.
Limitation: Requires two operators working in synchrony. Prone to bowing in the middle on longer spans — a 2×4 over 8 feet deflects under its own weight and the concrete load, creating a crown in the centre of the slab.
Worked Example — Residential Patio:
A 10 ft × 12 ft patio pour, 4 inches thick. Screed rails set on form boards at finished slab elevation. Two operators screed the 10-foot width with a 12-foot 2×4 board, sawing motion, advancing 12 inches per pass. 12 passes to complete the 12-foot length. Time: approximately 15–20 minutes for screeding.
Aluminum Screed Bar
The aluminum screed bar — a hollow or solid aluminium extrusion, typically D-shaped, H-shaped, or flat profile — replaces the 2×4 board for improved rigidity, lighter weight, and better edge contact with screed rails.
Advantages over 2×4:
- Rigid across longer spans (aluminium H-screed maintains straightness to 16+ feet)
- Lighter — 12-foot aluminium screed weighs 3–5 lbs vs 6–8 lbs for 2×4
- Smooth surface — concrete does not stick to aluminium the way it does to wood
- Durable — lasts for hundreds of pours without warping
Available lengths: 4 ft, 6 ft, 8 ft, 10 ft, 12 ft, 14 ft, 16 ft. Match length to slab width plus 12 inches overhang on each side.
The aluminum concrete screed available here is a well-reviewed option for residential and commercial use — the rigid extruded profile maintains flatness across spans where a lumber screed would deflect, and the aluminium surface releases concrete cleanly for a more consistent cut.
Vibrating Screed
A vibrating screed adds a mechanical vibration component to the screed bar — a small electric or gasoline vibration motor attached to the screed blade vibrates the screed as it moves, consolidating the concrete at the surface while leveling it simultaneously.
The advantage: Standard screeding only cuts the surface to elevation — the concrete beneath the screed surface may still have voids. A vibrating screed consolidates the top 2–3 inches of concrete as it levels, producing better density and fewer surface voids without a separate vibration pass.
Vibrating screed specifications:
- Motor: Electric (110V or 240V) or gasoline (1–2 HP)
- Blade lengths: 4 ft to 24 ft (standard 8 ft and 10 ft blades most common)
- Vibration frequency: 2,000–4,000 VPM depending on motor
- Weight: 8–25 lbs for the complete unit
Best for: Residential and commercial slabs where both leveling and surface consolidation are needed in one pass. Particularly useful on stiff mixes that resist standard screed consolidation.
Roller Screed
The roller screed replaces the flat blade of a standard screed with a rotating cylinder — the cylinder rolls across the concrete surface rather than sliding, reducing friction and requiring less force, especially on large spans.
Key advantage: A roller screed can be extended to cover slab widths up to 40+ feet with less operator fatigue than a flat screed of equivalent span. The rolling action also provides some compaction benefit.
Best for: Large residential slabs, driveways, and commercial floors where span width exceeds practical flat-screed length.
Laser Screed
Covered in detail in its own section below — the laser screed is the professional-grade automated version of the screeding process.
Bull Float — Flattening After Screeding
The bull float is the second flattening tool in the concrete finishing sequence — it is used immediately after screeding to embed aggregate, close the surface, and remove screed marks before the concrete begins to stiffen.
How a Bull Float Works
A bull float is a large, flat rectangular plate — typically 8 to 18 inches wide and 3 to 5 feet long — attached to a long telescoping handle. The operator pushes and pulls the float across the screeded concrete surface from the edge of the slab (or from a standing position for smaller pours).
What the bull float does:
- Pushes coarse aggregate slightly below the surface — reducing surface porosity and preparing for troweling
- Closes the holes and marks left by the screed board
- Adds a second leveling pass — small ridges and low spots from screeding are smoothed
- Seals the surface slightly — reducing moisture loss during bleed
Operating technique: The bull float blade angle determines its effect:
- Leading edge slightly raised (pushing float forward): Float planes across the surface, cutting high spots and filling low spots
- Trailing edge slightly raised (pulling float back): Float presses down, embedding aggregate and closing surface
- A skilled operator alternates between these two blade angles in each pass
Bull Float Sizes and Handle Lengths
Float blade sizes:
- 8 × 36 inches: Light duty, small pours
- 10 × 48 inches: Standard residential
- 16 × 48 inches: Heavy commercial
- 18 × 48 inches: Maximum standard size
Handle lengths: Telescoping handles from 6 to 20 feet allow the operator to reach the centre of pours up to 40 feet wide from the edge.
Worked Example — Garage Floor:
A 24×24 ft garage floor, one operator with a 16×48-inch magnesium bull float and 16-foot telescoping handle. Standing at the form edge, the operator can reach the centre of the 24-foot wide garage (12 feet from the edge). Bull float pass: two overlapping strips cover the full width — each pass takes approximately 4 minutes at comfortable working speed. Full floor: 6 passes × 4 minutes = 24 minutes of bull floating.
Magnesium vs Aluminum Bull Float
| Property | Magnesium | Aluminum |
|---|---|---|
| Weight | Lighter | Heavier |
| Surface drag | Less friction on concrete | More friction |
| Durability | Good | Better |
| Corrosion resistance | Moderate | Better |
| Cost | Higher | Lower |
| Best for | Large slabs where fatigue matters | General use |
Professional concrete finishers almost universally prefer magnesium for bull floats — the reduced weight and friction make a significant difference on large pours where the float may be pushed and pulled hundreds of times in a session.
Darby — Hand Flattening for Small Areas
The darby is a smaller, hand-held version of the bull float — typically 3 to 4 feet long and 4 to 6 inches wide, with two handles attached to the back face for two-hand operation.
When to Use a Darby
The darby fills the gap between bull float and trowel — it provides a second leveling pass on smaller areas where the bull float is too large or awkward, and it operates at a scale where hand pressure can be applied more precisely than from the end of a long handle.
Primary applications:
- Corners and edges where the bull float cannot reach effectively
- Small pours (under 50 sq ft) where a bull float is unnecessary
- Areas around door frames, columns, and penetrations
- Decorative concrete work where precise surface leveling matters
Technique: Two hands grip the handles, the darby is pushed and pulled across the surface with slight downward pressure. The operator moves systematically in one direction, then perpendicular, to catch all surface irregularities.
Darby vs Bull Float
| Factor | Darby | Bull Float |
|---|---|---|
| Reach | Arms length | Up to 20 ft with handle |
| Control | High | Moderate |
| Coverage speed | Slow | Fast |
| Best scale | Under 100 sq ft | Over 50 sq ft |
| Edge work | Excellent | Poor |
| Professional use | Specialist finishing | Universal |
Hand Screed and Fresno — Extended Reach Tools
Fresno Trowel for Large Slabs
The Fresno trowel is a large steel or magnesium finishing tool — similar in appearance to a bull float but with a flat steel blade rather than a thick float plate. It is used for the finish troweling stage rather than the initial flattening, but its large size and long handle give it a role in the flattening sequence on large slabs.
Size: Typically 12–24 inches wide, 48 inches long, with a 6–16 foot handle.
Distinguishing feature: The Fresno has a slight curved profile (rocker) across its width — this allows it to be used for both flattening and initial finishing in one operation on large slabs, replacing a separate bull float and first trowel pass.
Best for: Large commercial floors where reducing the number of tool passes saves significant time.
Hand Screed for Edges and Tight Areas
A hand screed — shorter than a full-length screed bar, typically 2–4 feet — is used for tight areas where the full-length screed cannot manoeuvre: around columns, at doorways, in utility trenches, and at any irregularity in the form layout.
Worked Example — Around a Floor Drain:
A garage floor pour with a central floor drain. The drain creates a circular obstruction that the main screed bar must pass around. A 2-foot hand screed is used to level the concrete in the 18-inch radius around the drain before and after the main screed bar passes — ensuring the drain surround is at the correct elevation and the slope toward the drain is consistent.
Power Screed — Mechanical Concrete Flattener
A power screed replaces manual screed operation with a mechanical vibrating blade — driven by an electric or gasoline motor, the vibrating blade is pushed across the concrete surface by one operator, consolidating and leveling simultaneously.
Electric Power Screed
Electric power screeds operate on 110V or 240V power supply — quieter than gasoline models and practical for indoor pours where engine exhaust is a concern.
Typical electric power screed specs:
- Motor: 1,000–1,600W
- Blade length: 4 ft to 12 ft (boards connect end-to-end)
- Vibration frequency: 3,000–4,500 VPM
- Weight: 8–20 lbs
Worked Example — Basement Floor:
A 20×25 ft basement floor pour (500 sq ft). Electric power screed with 8-foot blade on screed rails set at finished elevation. One operator pushes the screed from one end to the other, pulling back slightly then advancing. Total screeding time: approximately 25–35 minutes — significantly faster than manual 2×4 screeding and without the two-operator requirement.
Gasoline Power Screed
Gasoline power screeds provide independence from electrical supply — essential for outdoor pours on sites without power access. They are louder than electric models but offer full portability.
Typical gasoline power screed specs:
- Engine: 1–2 HP, 4-stroke gasoline
- Blade length: 4 ft to 24 ft (modular blades)
- Vibration frequency: 2,500–4,000 VPM
- Weight: 12–25 lbs for motor unit
Vibrating Power Screed Blades
The blade is the interchangeable component of a power screed system — the motor unit attaches to different blade lengths to suit the slab width.
Blade length selection:
Blade length = Slab width + 12 inches overhang each side
For a 12-foot wide driveway: minimum 14-foot blade (achieved by connecting two 7-foot sections or one 14-foot single blade).
Blade profiles:
- Flat blade: Standard for most residential and commercial applications
- Tapered edge blade: Feathers the edge of the screed more gradually — useful at form edges
- Notched blade: Creates drainage channels in specific patterns during screeding
Laser Screed — Professional Grade Concrete Leveling
The laser screed is the highest-level concrete flattening tool — a self-propelled machine guided by a rotating laser reference plane that automatically maintains the correct concrete surface elevation without screed rails.
How Laser Screeds Work
A laser transmitter set up beside the pour area projects a rotating laser beam at the exact finished floor elevation. The laser screed machine carries a laser receiver that detects the laser beam continuously. A hydraulic system automatically raises or lowers the screed head to maintain the laser elevation reference — if the machine moves into a high spot, the screed head lowers automatically; if it moves into a low spot, the head raises.
The machine moves forward under its own power, screeding and consolidating the concrete surface to laser-controlled elevation without any screed rails and without constant operator adjustment.
Flatness tolerance achievable: Laser screeds routinely achieve F-number flatness ratings of FF30–FF50 (ASTM E1155) — significantly better than manual screeding (typically FF15–FF25) and adequate for most polished floor, large-format tile, and forklift operations.
When Laser Screeds Are Specified
| Application | Flatness Requirement | Tool Specification |
|---|---|---|
| Residential driveway | FF15–20 | Manual or power screed |
| Residential garage | FF20–25 | Power screed |
| Commercial floor (retail) | FF25–35 | Power screed or laser |
| Warehouse floor | FF35–50 | Laser screed |
| Superflat floor (forklifts) | FF50–100+ | Laser screed + hand grinding |
| Polished concrete | FF35–50 | Laser screed |
Laser screed machines are not purchased by most contractors — they are typically rented from specialist concrete equipment suppliers at $500–$1,500 per day, or contracted as part of a specialist floor placement service.
Concrete Flattener Tool Comparison Table
| Tool | Flatness Achievable | Scale | One Operator? | Cost Range |
|---|---|---|---|---|
| 2×4 screed board | FF12–18 | Under 10 ft wide | No (2 required) | $0 (lumber) |
| Aluminum screed bar | FF15–22 | Up to 16 ft wide | No (2 preferred) | $30–$80 |
| Darby | FF20–28 (small area) | Under 50 sq ft | Yes | $40–$100 |
| Bull float | FF18–26 | All sizes | Yes | $60–$200 |
| Fresno trowel | FF22–30 | All sizes | Yes | $80–$250 |
| Vibrating screed | FF22–30 | Up to 24 ft wide | Yes | $200–$600 |
| Power screed (electric) | FF25–35 | Up to 20 ft wide | Yes | $300–$800 |
| Power screed (gas) | FF25–35 | Up to 24 ft wide | Yes | $400–$1,200 |
| Laser screed | FF35–60+ | Any size | 1–2 operators | Rent $500–$1,500/day |
How to Flatten Concrete — Step by Step
Timing — When to Start
Screeding must begin immediately after concrete placement — before the mix begins to stiffen. The window for screeding is typically 20–40 minutes from placement in warm conditions, longer in cool weather.
The timing test: Push a screed bar or board across the surface. If the concrete ahead of the screed creates a wave that fills in behind the screed as it passes, the timing is correct. If the concrete ahead of the screed does not create a wave (too stiff), screeding has been delayed too long.
Screed First, Float Second
Never bull float before screeding. The bull float closes the surface and embeds aggregate — making it harder to cut the surface to the correct elevation afterward. Always screed to the correct elevation first, then bull float.
Correct sequence:
- Place concrete (with vibration if required)
- Screed to grade — cut to screed rail elevation
- Bull float immediately after screeding — same crew member follows behind the screed operators
- Check flatness with a long straight edge — identify any remaining high or low spots
- Correct remaining defects with darby or hand screed before concrete stiffens
Common Flattening Mistakes
Mistake 1 — Screeding too late.
Concrete that has begun to stiffen cannot be effectively screeded — the mix resists the screed rather than leveling under it. Once concrete is too stiff to form a wave ahead of the screed, do not attempt to screed. Mark the location and plan a patch or grinding correction after curing.
Mistake 2 — Using excess water to make screeding easier.
Adding water to fresh concrete to reduce friction and make it easier to screed increases the water-cement ratio — directly reducing compressive strength. Add water before the pour if workability is inadequate; never add water after placement.
Mistake 3 — Not checking for level after screeding.
Always check screeded surfaces with a long straight edge (minimum 10 feet) before bull floating. The bull float conceals surface irregularities — a high spot that would be visible before floating becomes invisible under the smoothed surface but reappears after curing.
Mistake 4 — Bull floating over bleed water.
If bleed water is visible on the surface, do not bull float — the float will work this excess water into the surface paste, weakening it. Wait for bleed water to evaporate before floating.
Concrete Flattener Tool by Application
Residential Driveway and Patio
Recommended tools: Aluminum screed bar (matched to driveway width) + magnesium bull float + optional vibrating screed for better consolidation.
Worked Example — 16 ft × 40 ft Driveway:
Width: 16 feet. Screed bar: 18-foot aluminum screed bar (2 ft overhang each side). Two operators screed across the 40-foot length in approximately 8 strips of 5 feet each. Bull float follows immediately after each strip. Total screeding time: 30–45 minutes. Total bull floating time: 20–30 minutes.
Required flatness: FF18–22 — easily achieved with aluminum screed and bull float. No laser screed required.
Garage Floor and Warehouse Slab
Recommended tools: Power screed (electric or gasoline) for residential garage. Laser screed for warehouse floors requiring FF35+.
Garage floor: A single-operator power screed with an 8-foot blade on screed rails set at the finished floor elevation completes a 24×24 ft garage floor screeding in approximately 20–30 minutes. Bull float follow-up is still required after power screeding.
Warehouse slab: Laser screed on a 50,000 sq ft warehouse floor achieves FF40–50 flatness — required for order-picking forklift operations where floor flatness directly affects load safety.
Pool Deck and Curved Areas
Recommended tools: Hand darby or short bull float + aluminium screed for straight edges.
Curved pool deck areas cannot be screeded with standard long straight screeds — the curve means the screed cannot maintain contact with both screed rails simultaneously. A hand darby and careful manual leveling achieves adequate flatness for pool deck applications (FF15–20).
Decorative Overlay and Thin Section
Recommended tools: Gauge rake (notched tool) + hand darby or steel straight edge.
For thin decorative overlays (under 1 inch thick), standard screeds are too aggressive — a gauge rake or notched squeegee maintains uniform thickness without cutting through the overlay. A darby provides final leveling without the pressure concentration of a screed bar edge.
Frequently Asked Questions
What is a concrete flattener tool?
A concrete flattener tool is any instrument used to level fresh concrete to a uniform, flat surface — including screed boards, aluminum screed bars, bull floats, darbies, vibrating screeds, power screeds, and laser screeds. Flattening happens immediately after concrete placement, before any finishing or texturing, and establishes the finished surface elevation and flatness that the concrete will hold permanently after curing.
What is the difference between a screed and a bull float?
A screed cuts the concrete surface to the correct elevation by riding on screed rails or form edges — it is the primary leveling tool used first. A bull float follows screeding and closes the surface, embeds aggregate, and removes screed marks without changing the elevation significantly. Always screed before bull floating — bull floating an un-screeded surface obscures irregularities without correcting them.
What is the best concrete flattener tool for a residential driveway?
For most residential driveways, an aluminum screed bar matched to the driveway width plus a magnesium bull float is the correct combination. The aluminum screed establishes the finished elevation across the driveway width; the bull float follows to close the surface and remove screed marks. For driveways where one operator will work alone, a vibrating power screed reduces the two-person screed requirement to a single-operator operation.
How do I flatten concrete by hand?
Set screed rails or use form boards at the finished slab elevation. Drag a straight 2×4 board or aluminum screed bar across the surface in a sawing motion — slightly left-right while advancing — to cut the surface to the screed rail height. Immediately follow with a bull float to close the surface. Work in strips that overlap slightly. Complete screeding before the concrete begins to stiffen (typically within 30–40 minutes of placement).
What is a power screed and do I need one?
A power screed is a mechanically vibrating screed bar — driven by an electric or gasoline motor, it vibrates the screed blade at 2,500–4,500 VPM while the operator pushes it forward. It is more effective than a manual screed at consolidating the upper concrete layer, can be operated by one person rather than two, and produces better flatness (FF25–35) than manual screeding (FF15–22). A power screed is useful for any pour over approximately 200 sq ft and is almost always worth renting or purchasing for a contractor doing regular slab work.
What is a laser screed and when should I use one?
A laser screed is a self-propelled machine guided by a rotating laser reference plane that automatically maintains finished floor elevation without screed rails. It achieves FF35–60+ flatness — required for warehouse floors, forklift operations, polished concrete, and large-format tile installations. For residential work, laser screeds are unnecessary and disproportionately expensive. For commercial floor projects exceeding 5,000 sq ft with flatness requirements above FF30, laser screeds are typically specified.
What size bull float do I need?
For residential pours (driveways, patios, garage floors under 24 ft wide): a 10×48-inch or 16×48-inch bull float with a 10–16 ft telescoping handle covers the full slab width from the edge. For commercial floors: 16–18-inch wide floats with longer handles or walk-behind float machines are standard. Match handle length to slab half-width — the float must reach the centre of the slab from the form edge without the operator stepping onto fresh concrete.
Conclusion
Concrete flatness is determined in the first 40 minutes after placement — the tools and technique applied in that window determine whether the surface meets its specification or requires grinding corrections later. Screed with a rigid straight edge (aluminium bar preferred over lumber), follow immediately with a bull float, check with a straight edge before the window closes, and correct any remaining defects with a darby or hand screed before the concrete stiffens. For larger commercial pours, a power screed reduces operator count and improves flatness without significant additional cost. For warehouse and polished floor applications, a laser screed is the only tool that reliably achieves the flatness tolerance these surfaces require. Calculate your concrete volumes accurately before every pour with the ConcreteCal free concrete calculator — and for the finishing tools that follow flattening, see our complete types of trowels for concrete guide.