
Every concrete structure starts with a form. Without formwork, poured concrete has no shape — it flows wherever gravity takes it. The form defines the geometry, holds the concrete in place while it hardens, and directly determines the quality of the finished surface. A well-built form produces a clean, level, dimensionally accurate concrete element. A poorly built form leaks, deflects, or fails — and concrete form failure is one of the most dangerous events on a construction site.
The types of concrete forms range from simple lumber boards nailed together for a residential driveway edge to engineered climbing form systems used to construct skyscraper cores. Choosing the right form material and system for your application determines cost, reuse potential, surface finish quality, and structural safety. Once the forms are removed, using the right finishing tools is equally important for achieving a smooth and durable surface. Learn more in our guide on types of concrete trowels.
This guide covers every major form type — material, application, hardware, pressure calculations, and stripping guidance — so you can specify and build forms that work the first time.
Before calculating your concrete volume for any formed pour, use the free concrete calculator at ConcreteCalc — accurate volume calculation prevents over-ordering and under-ordering on every project.
Table of Contents
- What Are Concrete Forms and Why Do They Matter?
- Types of Concrete Forms by Material
- Types of Concrete Forms by Application
- Insulated Concrete Forms (ICF)
- Modular and Engineered Formwork Systems
- Form Hardware and Accessories
- How to Build Concrete Forms for a Slab
- Concrete Form Stripping — When and How
- Types of Concrete Forms — Selection Guide
- Frequently Asked Questions
What Are Concrete Forms and Why Do They Matter?
Concrete forms — also called formwork or shuttering — are temporary or permanent molds that contain fresh concrete during placement and curing until it achieves sufficient strength to support itself.
The form must accomplish three things simultaneously:
1. Shape — define the geometry of the finished element precisely 2. Contain — resist the lateral pressure of fresh concrete without deflecting, leaking, or failing 3. Release — strip cleanly from the hardened concrete without damaging the surface
Types of concrete forms fail when any one of these three functions is compromised. A form that shapes perfectly but leaks produces a honeycombed surface. A form that contains perfectly but will not release damages the concrete during stripping. A form that releases perfectly but deflects under pressure produces a curved wall that should be straight.
How Concrete Pressure Affects Form Design
Fresh concrete behaves like a fluid — it exerts lateral (sideways) pressure on vertical forms. This pressure is highest at the bottom of the form and decreases toward the top.
Key factors affecting lateral pressure:
- Pour rate — faster pouring = higher pressure (concrete at the bottom hasn’t had time to begin setting)
- Concrete temperature — colder concrete sets more slowly = higher pressure duration
- Concrete unit weight — standard 150 lbs/ft³
- Form height — taller forms experience higher total pressure at the base
Simplified lateral pressure formula (ACI 347):
For walls poured at standard rates:
Maximum pressure = 150 × h (where h = height of fresh concrete in feet)
Worked Example — 8-foot Foundation Wall:
Maximum lateral pressure = 150 × 8 = 1,200 lbs per square foot at the base
This is a significant force — 1,200 lbs acting on every square foot of form surface at the bottom of the wall. Forms must be designed to resist this without deflecting more than 1/270 of the span between supports.
Form Failure — What Happens When Forms Are Undersized
Concrete form failure is a serious construction safety event — fresh concrete weighs 150 lbs/ft³ and moves rapidly when released from a failed form.
Common causes of form failure:
- Insufficient bracing or staking
- Inadequate form tie spacing for the design pressure
- Form panels too thin for the span between supports
- Pour rate too fast for the form’s design capacity
- Subgrade failure beneath footing forms
According to OSHA’s concrete and masonry construction standard (29 CFR 1926 Subpart Q), formwork must be designed by or under the supervision of a qualified person — and drawings or plans must be available at the job site for any formwork supporting loads in excess of what wood lumber forms can safely carry.
Types of Concrete Forms by Material
Lumber and Plywood Forms
Lumber and plywood forms are the most common formwork for residential construction — simple to build, widely available, and adequate for most flatwork and light wall applications.
Standard lumber form components:
- Form boards: 2×4 or 2×6 dimensional lumber for slab edges (height = slab thickness)
- Form panels: 3/4-inch plywood for wall forms and larger poured elements
- Stakes: 1×4 or 2×4 lumber driven into the subgrade to hold form boards against concrete pressure
- Bracing: Diagonal lumber bracing for wall forms against lateral pressure
Advantages:
- Low cost — standard dimensional lumber is widely available
- Easy to cut and assemble on site
- No special equipment required
- Adequate for single-use residential pours
Limitations:
- Low reuse — lumber forms typically survive 1–5 pours before degrading
- Prone to moisture absorption — plywood swells and warps when wet
- Labor-intensive assembly for complex shapes
- Inconsistent surface finish compared to engineered forms
Worked Example — Residential Driveway Forms: A 16 ft × 40 ft driveway, 5 inches thick. Form specification:
- 2×6 lumber for form sides (5.5 inches — slightly over the 5-inch slab thickness, trimmed or used as-is)
- Stakes every 2 feet along both long sides = 40 stakes total
- Minimum 2 screws per stake into form board
- Check level along both sides with a string line before pouring
Total lumber: 2 runs of 40 ft = 80 linear feet of 2×6, plus 40 stakes. Cost: approximately $80–$120 in materials.
Steel Forms
Steel forms are reusable metal form panels — standard in commercial and infrastructure construction where the high initial cost is justified by hundreds of reuses.
Advantages:
- Extremely high reuse factor — 200–1,000+ pours per panel
- Precise dimensions — panels are manufactured to exact tolerances
- Smooth, consistent surface finish on concrete
- Strong — resists high lateral pressure without additional reinforcement
- Fast assembly with standard hardware
Limitations:
- High initial cost — $15–$50 per square foot of form face
- Heavy — requires equipment for large panel handling
- Requires proper cleaning and oiling after every pour
- Not practical for one-off residential projects
Best for: Bridge construction, tunnel linings, large foundation walls, any project with repetitive forming of the same geometry.
Aluminum Forms
Aluminum forms offer a middle ground between lumber and steel — lighter than steel forms, stronger and more reusable than lumber.
Weight comparison:
- Steel form panels: 5–8 lbs/sq ft
- Aluminum form panels: 2.5–4 lbs/sq ft
- Lumber (3/4″ plywood): 2.2 lbs/sq ft
Reuse factor: 50–80 pours per panel with proper maintenance — significantly better than lumber but less than steel.
Best for: High-rise residential construction, repetitive residential foundations, any application where steel is too heavy for manual handling but lumber reuse is insufficient.
Plastic and Composite Forms
Plastic and composite (fiberglass/resin) forms are growing in popularity — particularly for curved elements and architectural concrete where surface quality is paramount.
Key advantages:
- Smooth, non-absorbent surface — produces the highest quality concrete surface finish
- Lightweight — easier to handle than steel or aluminum
- Does not absorb moisture — no swelling or warping
- Excellent release properties — often requires no form release agent
Best for:
- Architectural and decorative concrete where surface appearance is critical
- Curved and complex shapes that would require extensive custom lumber formwork
- Precast concrete production
Reuse factor: 10–30 pours depending on panel design and care.
Foam Forms
Rigid foam (EPS — expanded polystyrene) forms are used for simple residential applications — particularly as void forms beneath post-tensioned slabs and as edge forms for decorative concrete borders.
Carton void forms: Corrugated cardboard or foam tubes placed beneath grade beams and isolated footings — they compress or dissolve during curing, creating a void space that allows soil movement without lifting the slab. Standard in expansive clay soil regions.
Foam edge forms: EPS foam boards used as temporary edge forms for patios and decorative slabs — easy to cut to shape for curved edges.
Types of Concrete Forms by Application
Slab Forms — Flatwork and Grade Beams
Slab edge forms contain the perimeter of a concrete flatwork pour — driveway, patio, garage floor, or foundation slab.
Key requirements:
- Height exactly equal to slab thickness (or slightly above to allow screed to ride on top)
- Level along the top edge — the screed rides on form tops to establish finished elevation
- Staked firmly enough to resist concrete pressure during pour and vibration
Grade beam forms: Grade beams are thickened edge sections of slab-on-grade foundations — typically 12–18 inches deep and 12 inches wide. They require deeper form boards (2×12 lumber or doubled 2×6) and staking at closer intervals to resist the greater concrete head pressure.
Worked Example — Grade Beam Form: A perimeter grade beam, 18 inches deep, 12 inches wide, 60 linear feet. Concrete lateral pressure at base: 150 × 1.5 ft = 225 lbs/sq ft.
Form specification:
- 2×10 and 2×8 boards nailed together for 18-inch height
- Stakes every 18 inches (close spacing for deeper pour)
- Diagonal bracing at every other stake
Wall Forms
Wall forms must resist significantly higher lateral pressure than slab edge forms — a standard 8-foot wall form experiences up to 1,200 lbs/sq ft at the base.
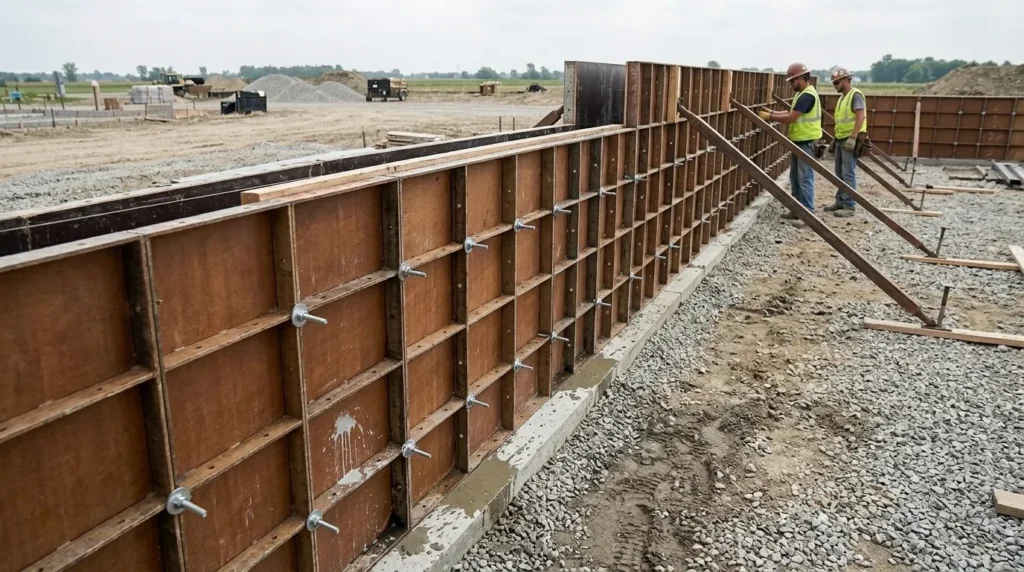
Wall form system components:
- Form panels: Plywood (3/4 inch minimum) or engineered form panels
- Walers: Horizontal members behind the plywood that distribute pressure to the ties
- Form ties: Through-bolts that connect the two form faces and resist the outward pressure of the concrete
- Strongbacks: Vertical members behind the walers for additional stiffness on tall walls
- Bracing: Diagonal braces from the top of the form to the ground
Form tie spacing determines the form’s load-carrying capacity — tighter tie spacing allows thicker pours and faster pour rates.
Column Forms
Column forms create square, rectangular, or circular cross-sections for structural columns.
Fiber tube forms (Sonotube): Cardboard fiber tubes available in 6–60 inch diameters — the standard form for round concrete columns, fence posts, and sign bases. Simply set in position, fill with concrete, and peel away after curing.
Square column forms: Built from 4 panels of 3/4-inch plywood with lumber cleats — or prefabricated steel/aluminum column forms for commercial applications.
Worked Example — Deck Post Footing: Four deck post footings, 12-inch diameter × 48 inches deep. Using 12-inch fiber tube forms:
- Cut tubes to 48 inches + 2 inches above grade
- Set in drilled holes
- Brace plumb
- Pour concrete — approximately 2.5 cubic feet per tube = 10 cubic feet total = 0.37 cubic yards
- After 24-hour cure: peel tube from exposed section
Footing and Foundation Forms
Strip footings and isolated pad footings support foundation walls and columns — they transfer structural loads to the bearing soil below.
Strip footing forms:
- Two parallel form boards defining the footing width (typically 12–18 inches for residential)
- Form height = footing thickness (typically 8–12 inches)
- Stakes on outside of both form boards every 2 feet
- Spreader blocks inside the form maintain exact footing width
Isolated pad footing forms:
- Four-sided box of 2×10 or 2×12 lumber
- Interior dimensions = footing plan size
- Staked on all four sides
- Level check before pouring
Curb and Radius Forms
Curved concrete elements — garden borders, curved driveways, circular patios — require forms that can bend to the required radius.
Methods for curved forms:
Kerfed lumber: Saw cuts made partway through a 2×4 board at 1-inch intervals allow it to bend around curves. Bend radius depends on kerf spacing and depth.
Hardboard/thin plywood: 1/4-inch hardboard or bending plywood bends easily for moderate curves — typically used for landscape curbs and decorative garden edging.
Flexible plastic form boards: Commercial product designed specifically for curved concrete edges — bends smoothly without kerfing and stakes in the same way as standard lumber forms.
Worked Example — Curved Patio Edge: A circular patio, 16-foot diameter (radius = 8 feet). Using 1/4-inch hardboard in 8-foot lengths:
- Calculate circumference: π × 16 = 50.3 linear feet of form
- Hardboard pieces: 50.3 ÷ 8 = 7 pieces (rounding up)
- Stakes every 18 inches on the outside of the curve: 50.3 ÷ 1.5 = 34 stakes
Insulated Concrete Forms (ICF) — Stay-in-Place Formwork
Insulated Concrete Forms are rigid foam forms that stay in place permanently after the concrete is poured — they become part of the finished wall assembly, providing insulation, acoustic dampening, and a substrate for interior and exterior finishes.
How ICF Works
ICF blocks consist of two panels of expanded polystyrene (EPS) foam connected by plastic webbing. The blocks stack like interlocking Lego bricks, creating a hollow cavity that is filled with concrete and reinforced with rebar.
ICF wall assembly:
- Excavate and pour concrete footings with dowels projecting up at rebar spacing
- Stack ICF blocks course by course — interlocking corners and openings
- Install rebar horizontally and vertically inside the cavity
- Brace the wall system against concrete pour pressure
- Pour concrete in lifts (12–18 inches) with internal vibration
- After cure: apply finishes directly to foam faces (drywall interior, stucco or cladding exterior)
Concrete cavity width: Standard ICF blocks are available in 4-inch, 6-inch, 8-inch, 10-inch, and 12-inch cavity widths — corresponding to the finished concrete wall thickness.
ICF vs. Traditional Forms — Comparison
| Factor | ICF | Traditional Wood Form |
|---|---|---|
| Form removal | None — stays in place | Required after cure |
| Insulation value | R-22 to R-50 | None |
| Labor | Lower (no stripping) | Higher (build + strip) |
| Material cost | Higher | Lower |
| Energy efficiency | Very high | None |
| Sound attenuation | Excellent | None |
| Finish substrate | EPS foam (screws directly) | Concrete surface |
| Best for | Residential walls, basements | Any concrete element |
| Reuse factor | 0 (permanent) | 1–5 (lumber) |
ICF is increasingly specified for residential basement walls and above-grade walls in energy-conscious construction — the elimination of form stripping labor and the built-in insulation value often justify the higher material cost.
Modular and Engineered Formwork Systems
Panel Formwork Systems
Engineered panel formwork systems use modular steel or aluminum panels that connect with standard hardware — walers, ties, and clamps hold the panels in alignment and resist concrete pressure.
Common commercial panel systems:
- PERI TRIO / PERI DOMINO: European steel panel system — standard on large commercial and civil projects worldwide
- Symons Steel-Ply: US standard steel-ply panel system — common in North American commercial construction
- Doka Frami: Aluminum panel system for residential and light commercial walls
Panel dimensions: Typically 2×4 ft, 2×8 ft, or 4×8 ft — mix and match to fill any wall dimension.
Reuse: 200–500+ pour cycles per panel with proper maintenance.
Climbing and Jump Forms
Climbing and jump forms are used for tall vertical elements — high-rise building cores, dam faces, bridge piers — where the form must be repositioned upward after each pour lift.
Jump form: The entire form assembly — panels, working platform, and bracing — is lifted by crane to the next pour position after each lift.
Climbing form (self-climbing): Hydraulic jacks attached to form anchors in the previous pour lift the form upward without crane assistance. Standard for high-rise shear walls and cores.
Slip Forms
Slip forming is a continuous forming technique — the form moves upward slowly and continuously as concrete is placed and begins to set. Used for silos, chimneys, towers, and bridge piers where a continuous vertical pour is required.
Slip form rate: Typically 8–12 inches per hour vertical rise — the concrete must be stiff enough at the bottom of the form to self-support as the form passes.
Form Hardware and Accessories
Form Ties and Snap Ties
Form ties connect the two faces of a wall form and resist the outward pressure of the concrete. They are the most critical structural element in wall form design.
Snap tie: The standard residential wall form tie — a flat steel bar with enlarged ends that seat in form hardware. The tie snaps off at a breakpoint inside the wall after stripping, leaving a small conical recess that is patched with mortar.
She-bolt: A reusable tie system where a threaded rod passes through the form and a she-bolt nut bears on the outside. The rod is removed after stripping, leaving a smooth hole. Used for architectural concrete where surface finish is critical.
Coil tie: A heavy-duty tie using threaded coils embedded in the concrete face — used for high-pressure commercial applications.
Tie spacing rule: Maximum spacing is determined by the lateral pressure and the form panel’s bending capacity. A common residential wall form uses snap ties at 12–18 inch vertical spacing and 18–24 inch horizontal spacing.
Walers and Strongbacks
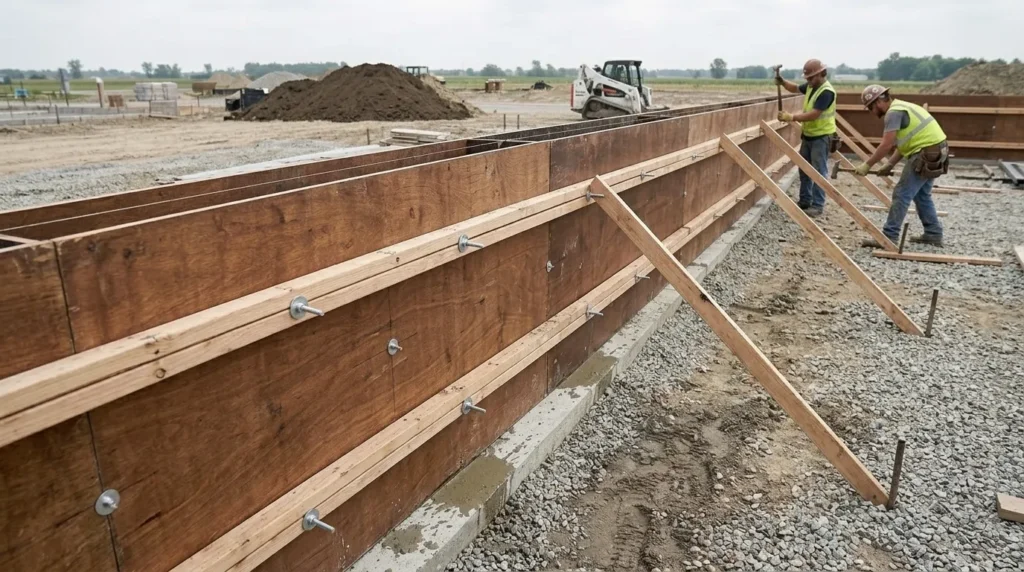
Walers are horizontal members (typically 2×4 doubled lumber or steel channels) that run behind the form panels and distribute the concrete pressure from the form face to the ties. Walers are always used on wall forms — they prevent the plywood from bulging between ties.
Strongbacks are vertical members behind the walers — used on tall walls where the waler spacing would be too large for the plywood span.
Standard residential wall form layout:
- Form panels: 3/4-inch plywood
- Walers: 2×4 doubled, at 12-inch vertical spacing in the lower half, 18-inch spacing upper half
- Form ties: at waler intersections
- Bracing: diagonal 2×4 from top of form to stakes in subgrade
Form Release Agents
Form release agents prevent concrete from bonding to the form face — essential for clean stripping and form reuse.
Types of release agents:
| Type | Best For | Application |
|---|---|---|
| Petroleum oil / diesel | Lumber and plywood forms | Brush or spray |
| Vegetable oil | Environmental compliance | Brush or spray |
| Commercial form oil | All form types | Spray |
| Wax-based release | Steel and aluminum forms | Wipe or spray |
| Reactive release agent | Architectural concrete | Spray |
Application: Apply a thin, even coat to the entire form face before setting up — never after the form is in position. Drips and pooling of release agent on the subgrade or rebar must be avoided — they can contaminate the concrete mix at the contact point.
How to Build Concrete Forms for a Slab — Step by Step
Building accurate slab forms is one of the most important steps in any residential concrete pour — the top edge of the form becomes the screed guide for the finished slab elevation.
Materials needed:
- 2×4 or 2×6 lumber (height = slab thickness)
- 1×4 or 2×4 stakes — one every 2 feet
- 3-inch screws or duplex nails
- String line and line level
- Tape measure and carpenter’s square
- Hammer and drill
Step 1 — Establish corners and layout. Mark the four corners of the slab with stakes. Pull a string line between corners to define the slab perimeter. Check for square by measuring diagonals — both diagonals must be equal for a rectangular slab.
Step 2 — Set grade stakes. Drive a stake at each corner and at 2-foot intervals along each side. Use a string line and line level to establish the top of form elevation — this determines the finished slab surface.
Step 3 — Attach form boards to stakes. Nail or screw the form board to the inside face of each stake — the top edge of the form board must be at the string line elevation. Check level along the entire form run with a 4-foot level.
Step 4 — Check dimensions. Measure the interior dimensions in both directions and both diagonals. Adjust until all dimensions are correct and the form is square and level.
Step 5 — Apply release agent. Coat the inside face of all form boards with form oil or petroleum jelly — this allows clean stripping without damaging the slab edge.
Worked Example — 12×20 ft Patio Form:
- Four corners established with batter boards and string lines
- String line pulled at finished slab elevation (4 inches above subgrade)
- 2×4 form boards nailed to stakes every 2 feet
- Total stakes: 2 × (12÷2) + 2 × (20÷2) = 12 + 20 = 32 stakes
- Diagonal check: both diagonals = 23.3 feet ✅ (confirms square)
- Form oil applied to all interior surfaces
Concrete Form Stripping — When and How
Stripping (removing forms) too early damages the concrete — too late risks bonding the form permanently to the concrete surface.
Minimum stripping times at 70°F (21°C):
| Element | Minimum Cure Time Before Stripping |
|---|---|
| Slab edge forms | 24 hours |
| Wall forms (non-load-bearing) | 24–48 hours |
| Wall forms (load-bearing) | 7 days |
| Column forms | 24–48 hours |
| Beam side forms | 24–48 hours |
| Beam bottom forms (shoring) | 14–28 days |
| Foundation forms | 24–48 hours |
In cold weather: Extend all stripping times — concrete gains strength more slowly below 50°F. Never strip forms when concrete is frozen or when freezing is likely within 24 hours of stripping.
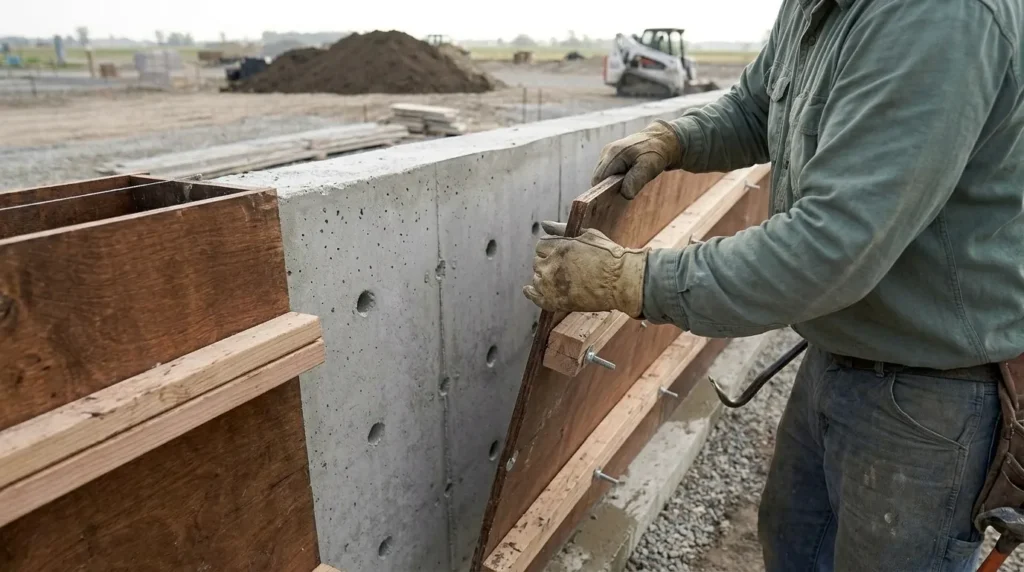
Stripping technique:
- Remove bracing and stakes first
- Loosen form boards gradually — do not pry directly against the concrete surface
- Snap ties: snap off at the breakpoint with a flat bar
- Remove forms parallel to the concrete surface — not by levering outward
- Inspect the concrete surface immediately — any defects (honeycombing, form tie holes) should be patched within 24 hours while the concrete is still green
Types of Concrete Forms — Selection Guide
| Project | Recommended Form Type | Material | Reuse |
|---|---|---|---|
| Residential driveway | Slab edge forms | 2×6 lumber | 1–3 uses |
| Residential patio | Slab edge forms | 2×6 lumber | 1–3 uses |
| Curved garden border | Curved slab form | 1/4″ hardboard or flex form | 1–2 uses |
| Foundation wall | Wall form | 3/4″ plywood + walers | 3–5 uses |
| Round post/column | Tube form | Fiber tube (Sonotube) | 1 use |
| Basement wall | Wall form or ICF | Plywood system or ICF | 3–5 / permanent |
| Commercial wall | Modular panel system | Steel or aluminum | 200–500 uses |
| Tall wall/core | Climbing or jump form | Engineered steel | 200–500 uses |
| Silo/tower | Slip form | Engineered steel | 50–100 uses |
| Energy-efficient wall | ICF | EPS foam | Permanent |
Frequently Asked Questions
What are the types of concrete forms?
The main types of concrete forms are lumber and plywood forms (most common for residential), steel forms (high reuse commercial), aluminum forms (lighter than steel, moderate reuse), plastic and composite forms (architectural finish), fiber tube forms (round columns and posts), insulated concrete forms or ICF (permanent stay-in-place residential walls), and modular engineered panel systems (commercial and infrastructure). Each type suits different applications, reuse requirements, and surface finish specifications.
What is the difference between formwork and concrete forms?
The terms are used interchangeably. Formwork refers to the complete temporary structure that supports fresh concrete — including panels, walers, ties, bracing, and working platforms. Concrete forms typically refers to the individual mold elements (panels or boards) that directly contact the concrete. In practice both terms describe the same system.
What material is best for concrete forms?
For residential DIY: 3/4-inch plywood and 2×4 or 2×6 lumber — widely available, easy to cut and assemble, adequate for single-use pours. For repeated residential use: aluminum or steel forms amortize their higher cost over multiple pours. For architectural concrete requiring the best surface finish: plastic or composite forms. For energy-efficient residential walls: ICF.
How long before concrete forms can be removed?
Slab edge forms and non-load-bearing wall forms can typically be stripped after 24–48 hours at 70°F. Load-bearing wall forms and beam-bottom shoring must remain in place for 7–28 days. Cold weather extends all stripping times significantly — never strip forms when the concrete is still gaining early strength below 50°F.
How do I prevent concrete from sticking to forms?
Apply a form release agent — petroleum oil, vegetable oil, or commercial form release spray — to all form surfaces that will contact concrete before setting up the forms. The release agent prevents the cement paste from bonding to the form face, allowing clean stripping. Never apply release agent to rebar or the subgrade.
What is an ICF form?
An Insulated Concrete Form (ICF) is a stay-in-place form made from expanded polystyrene (EPS) foam panels connected by plastic webbing. ICF blocks are stacked to form a wall, filled with reinforced concrete, and never removed — they become the insulation and finish substrate for the permanent wall. ICF provides R-22 to R-50 insulation values and is increasingly common in residential energy-efficient construction.
How do I build concrete forms for a wall?
Set up plywood panels on both sides of the wall, spaced apart by the specified wall thickness using form spreaders. Install snap ties through the form faces at designed spacing (typically 12–18 inches vertically, 18–24 inches horizontally). Install doubled 2×4 walers horizontally behind each panel face. Brace the form system with diagonal bracing from the top of the form to stakes in the subgrade. Check plumb and alignment before pouring.
Can concrete forms be reused?
Yes — the reuse factor depends on form material. Lumber forms: 1–5 uses. Fiber tube forms: 1 use (peel and discard). Aluminum panels: 50–80 uses. Steel panels: 200–500+ uses. Proper cleaning, oiling, and storage after each pour maximizes reuse life. Damaged form faces produce poor surface finishes and should be replaced.
What is slip forming in concrete?
Slip forming is a continuous forming technique where the form moves upward slowly and continuously as concrete is placed. The concrete at the bottom of the form has begun to set and self-supports as the form rises, while fresh concrete is placed at the top. Used for silos, chimneys, bridge piers, and other tall continuous vertical elements. Rise rates are typically 8–12 inches per hour.
Conclusion
Types of concrete forms range from two boards nailed to stakes for a residential driveway to engineered climbing systems constructing 60-story cores. The right choice depends on the element being formed, the number of reuses required, the surface finish specification, and the budget. For residential work, lumber and plywood forms cover the vast majority of applications at the lowest cost. For repeated commercial use, steel or aluminum panel systems deliver the lowest cost per pour over their service life. For energy-efficient residential walls, ICF eliminates stripping labor and adds permanent insulation in one step. Calculate your concrete volume accurately before building any form — use the ConcreteCal free concrete calculator to get your material quantities right before the first form board goes in the ground.