
Concrete curbs are one of those infrastructure elements that most people walk past every day without giving a second thought — until they need to specify one, install one, or understand why a particular type was chosen for a specific location. Then the questions come quickly. Why does the curb at the highway exit look completely different from the one at the end of a residential street? Why can a car drive over one curb but not another? What makes a curb ADA compliant?
The types of concrete curbs are more varied than most people realise — each designed to solve a specific combination of traffic management, drainage, and access requirements. The barrier curb that protects pedestrians at a busy urban intersection is an entirely different structural and geometric design from the gentle rolled curb at the edge of a quiet suburban cul-de-sac, which is different again from the valley gutter that manages stormwater across a low-point in a parking lot.
This guide covers every major concrete curb type — barrier, mountable, curb-and-gutter, valley gutter, drop curb, extruded, and precast — with design dimensions, applications, ADA requirements, concrete specification, and installation methods. Whether you are a civil engineer specifying a highway project, a contractor bidding a parking lot, or a homeowner trying to understand what is happening in front of your property, this is the reference.
For any concrete curb project, calculate your concrete volume accurately using our free concrete calculator at ConcreteCal.
Table of Contents
- What Is a Concrete Curb and What Does It Actually Do?
- The Main Types of Concrete Curbs
- Barrier Curb (Vertical Curb)
- Mountable Curb (Rolled Curb)
- Curb and Gutter — The Combined System
- Valley Gutter and Swale Curb
- Drop Curb and ADA Curb Cuts
- Extruded Curb — Machine-Formed
- Precast Concrete Curb
- Landscape and Decorative Concrete Curbing
- Concrete Curb by Application
- Curb Mix Design and Concrete Specification
- How Concrete Curbs Are Installed
- Concrete Curb Cost Guide
- Frequently Asked Questions
What Is a Concrete Curb and What Does It Actually Do?
A concrete curb is a raised or formed concrete element at the edge of a road, parking lot, or paved surface. It looks like a simple border — but its design, dimensions, and geometry are determined by a specific set of functional requirements that vary dramatically between applications.
The Four Jobs a Curb Performs
Understanding why curbs exist helps explain why different types are needed in different locations.
1. Edge definition and containment: A curb defines the boundary between the road surface and adjacent areas — lawns, footpaths, parking areas. Without this boundary, pavement edges deteriorate rapidly as vehicles drive partially onto the edge and water undermines the base.
2. Drainage management: Curbs channel stormwater along the road edge rather than allowing it to sheet across the road surface or flood adjacent properties. The gutter line at the base of the curb directs water to inlets and drainage structures. This is arguably the most structurally important function — water is the primary cause of pavement failure.
3. Traffic delineation and separation: The height of the curb face — the vertical distance between the road surface and the top of the curb — determines how effectively the curb separates vehicle traffic from pedestrian areas. A tall barrier curb physically prevents vehicles from mounting the footpath. A shallow mountable curb does not.
4. Pedestrian and vehicle guidance: Curbs define where vehicles can and cannot go. At driveway approaches and parking lot entrances, the curb profile determines whether vehicles can cross smoothly or must mount a step. At pedestrian crossings, curb cuts (dropped curbs) provide accessible transitions between road level and footpath level.
Curb vs. Kerb — The Terminology
Both spellings refer to the same element — the choice is geographic. Curb is standard in American English. Kerb is standard in British English, Australian English, and many Commonwealth countries. This guide uses “curb” throughout but the design principles and types are identical regardless of spelling.
The Main Types of Concrete Curbs
| Curb Type | Face Height | Vehicle Mountable? | Primary Application |
|---|---|---|---|
| Barrier (vertical) | 6–8 inches | ❌ No | Urban roads, high-speed roads |
| Mountable (rolled) | 3–4 inches | ✅ Yes | Residential streets, parking |
| Integral curb & gutter | 6–8 inches | ❌ No | Most road construction |
| Valley gutter | 0–2 inches | ✅ Yes | Low points, drainage crossings |
| Drop curb (ADA) | 0 at crossing | ✅ Designed for | Pedestrian crossings |
| Extruded (slipform) | Variable | Variable | Large-scale road projects |
| Precast | Variable | Variable | Parking lots, commercial |
| Landscape curbing | 3–5 inches | Variable | Garden borders, landscaping |
Barrier Curb (Vertical Curb)
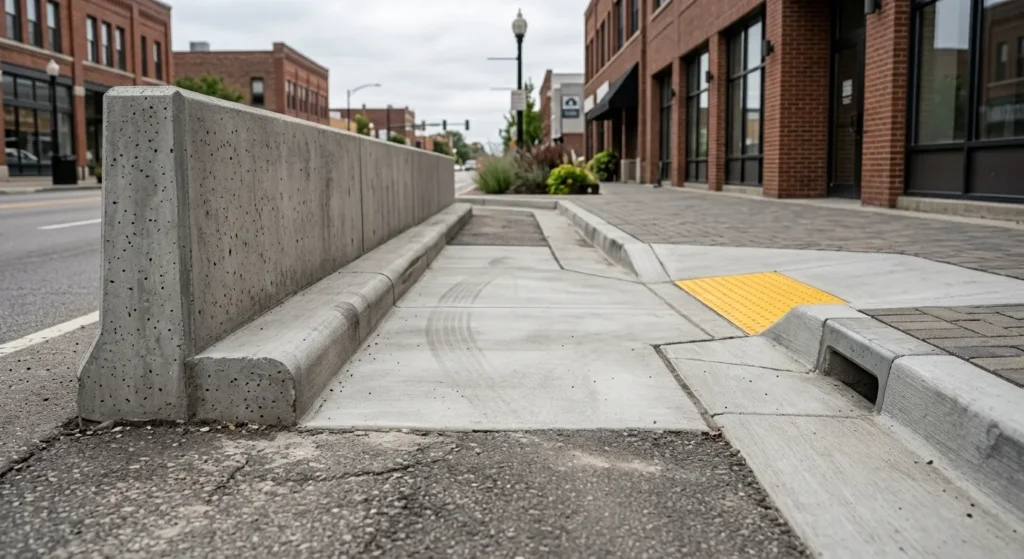
The barrier curb — also called a vertical curb, high-back curb, or straight-face curb — is the most common curb type on urban and arterial roads. Its defining characteristic is a near-vertical face that rises abruptly from the road surface, creating a physical barrier that normal vehicles cannot mount without significant damage.
This is the curb you see on most city streets — tall, assertive, and unambiguous in its message to drivers: the road ends here.
Standard Barrier Curb Dimensions
The geometry of a barrier curb is standardised in most municipal specifications. Common US standard dimensions:
AASHTO standard barrier curb (Type A):
- Total height: 7 inches above gutter line
- Face height (reveal): 6 inches vertical
- Top width: 6 inches
- Base width: 18 inches
- Back slope: approximately 1:3 (rises 1 inch for every 3 inches back from face)
FHWA and state DOT variations: Federal and state highway specifications vary slightly. The key parameter is the reveal — the vertical face height above the adjacent pavement surface. A 6-inch reveal is the threshold above which a vehicle cannot mount the curb without significant tyre or suspension damage.
Worked Example — Urban Arterial Road: A four-lane arterial road in a US city centre. Barrier curb specified at both road edges. Standard 6-inch reveal provides separation between 50 mph vehicle traffic and the adjacent pedestrian footpath. At this height, a passenger vehicle attempting to mount the curb would sustain significant wheel and suspension damage — creating a strong deterrent to unintended encroachment on the footpath.
Where Barrier Curbs Are Used
- Urban arterial and collector roads
- Streets where pedestrian footpaths are immediately adjacent to the road
- Areas where vehicle encroachment onto the footpath is a safety risk
- Downtown commercial streets
- School zones and areas with high pedestrian activity
Pros and Cons
Pros:
- Maximum separation between vehicle traffic and pedestrian areas
- Clear drainage channel at road edge
- Strong edge definition prevents pavement edge deterioration
- Vehicles cannot accidentally mount the curb
Cons:
- Cannot be crossed by vehicles at non-designated points — requires formal driveway approaches with dropped sections
- Ice and snow removal more difficult — snowplows cannot ride over the curb
- Not appropriate where access flexibility is needed (rural areas, wide-frontage commercial)
Mountable Curb (Rolled Curb)
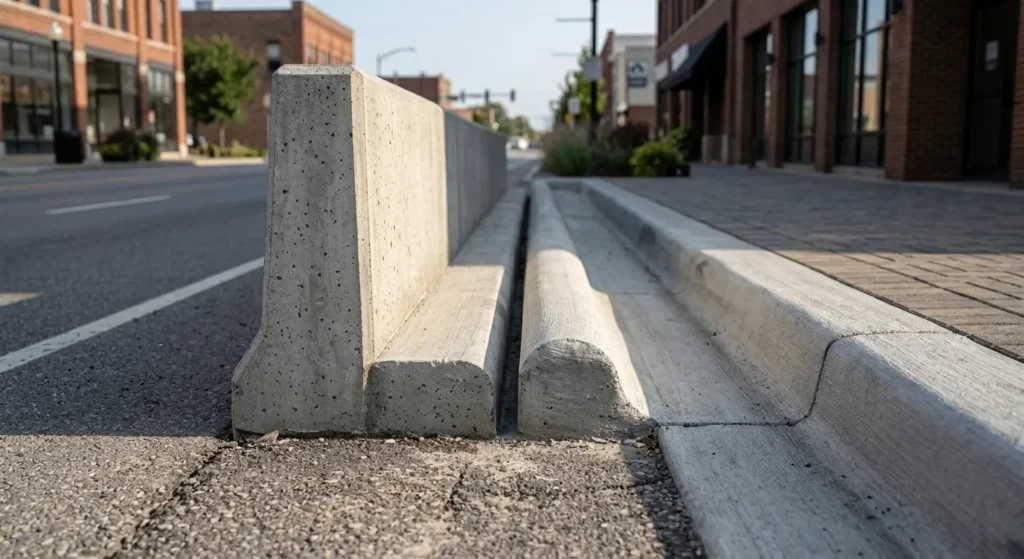
The mountable curb — also called a rolled curb, laid-back curb, or low-profile curb — has a curved or sloped face that rises gradually from the road surface to its full height. A standard vehicle can cross a mountable curb without damage if it approaches at a reasonable angle and speed.
This design serves a fundamentally different purpose from the barrier curb: it defines the road edge and provides drainage without creating a physical access barrier.
Standard Mountable Curb Dimensions
Typical US mountable curb profile:
- Total height: 6 inches
- Reveal (face height above road): 3–4 inches
- Face slope: approximately 1:1 (45-degree slope) or curved radius
- Top width: 4–6 inches
- Base width: 14–16 inches
The key dimension is the face slope — shallow enough that a vehicle can cross without tyre impact damage. The AASHTO standard for “mountable” is a maximum face slope of approximately 1:1 (45 degrees or shallower).
Where Mountable Curbs Are Used
- Residential streets with frequent driveway crossings
- Cul-de-sacs and low-volume residential roads
- Rural road edges where occasional vehicle crossings are expected
- Parking lot perimeters where vehicles may need to cross the curb edge
- Areas where snowplow equipment must ride over the curb line
Pros and Cons
Pros:
- Vehicles can cross without damage at designated or undesignated points
- Snowplow blades can ride over without catching
- Less abrupt visual character — suits lower-speed residential environments
- Lower risk of tyre damage from accidental curb contact
Cons:
- Less effective pedestrian protection — vehicles can mount the curb
- Not appropriate on high-speed roads where curb contact frequency is higher
- Provides less definitive edge delineation than barrier curb
Curb and Gutter — The Combined System
The most commonly specified road edge treatment in North American road construction is not a curb alone — it is a combined curb-and-gutter section cast as a single monolithic concrete element.
Integral Curb and Gutter (Monolithic)
A monolithic curb and gutter is cast in one continuous pour — the gutter pan (the flat drainage channel at the base of the curb) and the curb body are one continuous concrete section.
Standard dimensions for a residential street monolithic curb and gutter:
- Gutter pan width: 24–30 inches from the curb face to the outer edge
- Gutter pan thickness: 6–8 inches
- Curb height: 6–7 inches above gutter line
- Total section width (curb + gutter): 30–36 inches
- Concrete: typically 4,000 PSI with reinforcement per local specification
Why monolithic is preferred: Casting the curb and gutter as a single element eliminates the joint between them — a joint that would otherwise collect debris, allow water infiltration, and eventually separate. Monolithic construction produces a stronger, more durable edge section.
The concrete calculation for curb and gutter uses the cross-sectional area approach — calculate the cross-section area of the combined section and multiply by the linear length. For detailed curb and gutter volume calculations, see our guide on how to calculate yards of concrete which includes a worked curb-and-gutter example.
Separate Curb and Gutter
In some older road designs and specific reconstruction situations, the curb and gutter are separate elements — the gutter is poured as part of the road pavement, and the curb is placed separately against it.
When separate construction occurs:
- Road rehabilitation where the existing gutter is sound and only the curb needs replacement
- Staging construction where the road base and gutter are poured first and curb follows
- Specific local design standards in some jurisdictions
The limitation: The joint between a separate curb and gutter is a maintenance point — it collects debris and eventually opens, requiring joint sealing or reconstruction.
Valley Gutter and Swale Curb
A valley gutter is a depressed concrete channel section used at low points where stormwater must be directed across or through the roadway or pavement — rather than along the edge.
How Valley Gutters Work
Unlike a standard curb which keeps water at the road edge and directs it to an inlet, a valley gutter creates a transverse drainage path — it crosses the road or pavement perpendicular to the direction of travel, collecting water from both sides and directing it to a central low point or inlet.
Typical applications:
- At road intersections where surface drainage meets from multiple directions
- In parking lots at low points between two sloped pavement sections
- At driveway aprons where the driveway crosses the road edge drainage swale
- In landscaping where surface drainage must cross a paved path
Profile: The valley gutter has a shallow V or flat profile — typically 6–12 inches wide with a maximum depth of 2–3 inches at centre. The profile is gentle enough that vehicles cross it without significant impact.
Concrete specification: Typically 4,000 PSI minimum — the repeated vehicle crossings demand good abrasion and impact resistance. Reinforcement is specified for road crossings where heavy vehicle loads apply.
Drop Curb and ADA Curb Cuts
A drop curb — also called a curb cut, curb ramp, or depressed curb — is a section of barrier curb that has been lowered to road level to provide a smooth, accessible transition between the footpath and the road surface.
ADA Requirements for Curb Ramps
The Americans with Disabilities Act (ADA) mandates specific design requirements for curb ramps at all pedestrian crossings on federally funded projects — and most state and local codes extend similar requirements to all new and reconstructed pedestrian infrastructure.
ADA Standards for Accessible Design (ADASAD) key requirements:
| Parameter | Requirement |
|---|---|
| Maximum running slope | 1:12 (8.33%) |
| Maximum cross slope | 1:48 (2.08%) |
| Minimum width | 60 inches |
| Detectable warning surface | Required at road edge |
| Landing at top of ramp | Minimum 60″×60″, max 2% slope in any direction |
| Flare slope (where provided) | Maximum 1:10 (10%) |
These requirements ensure that the curb ramp is navigable by wheelchair users, people with visual impairments, and anyone using mobility aids. The slope limits prevent wheelchairs from tipping and ensure forward control is maintained during descent.
Detectable Warning Surfaces
At the base of every curb ramp — at the point where the ramp meets the road surface — ADA standards require a detectable warning surface. This is a field of raised truncated domes that provides a tactile signal to visually impaired pedestrians that they are approaching the road edge.
Specifications:
- Dome diameter: 0.9 inch (nominal)
- Dome height: 0.2 inch
- Center-to-center spacing: 2.35 inches
- Color: Federal yellow (high contrast with adjacent pavement) — required for federally funded projects; high-visibility colors recommended for all applications
Detectable warning surfaces can be cast into the concrete ramp, applied as surface-mounted tiles, or installed as precast panels set into the ramp surface.
Legal significance: Failure to provide compliant curb ramps and detectable warning surfaces at pedestrian crossings exposes municipalities and property owners to ADA complaints and litigation. Compliance is not optional on any project with public pedestrian access.
Extruded Curb — Machine-Formed
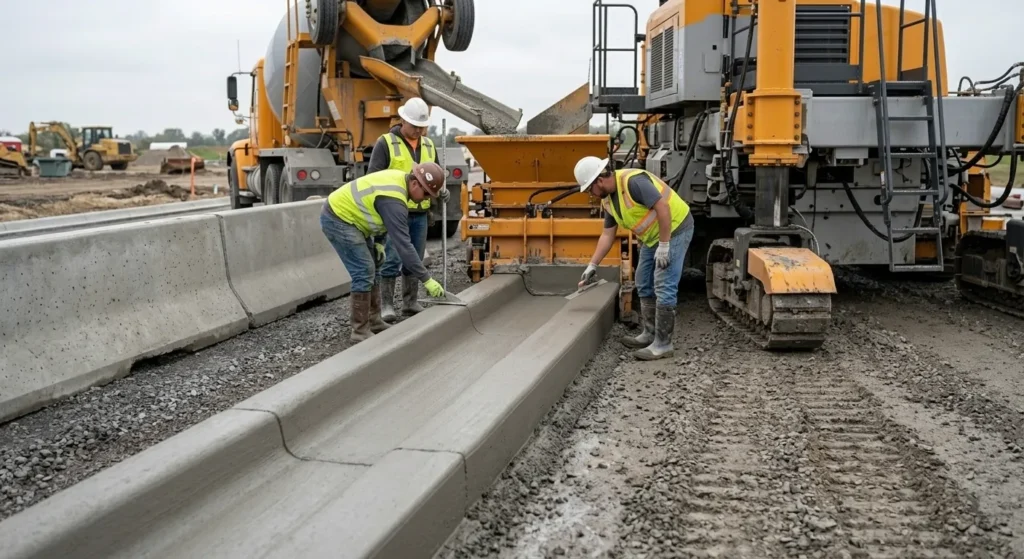
Extruded curb — also called slipform curb — is formed by a concrete paving machine that moves continuously along the road edge, forming the curb profile through a shaped extrusion die as it travels. The machine places, shapes, and finishes the curb in one continuous pass without formwork.
How Slipform Extrusion Works
The slipform paver carries a hopper of concrete. As the machine moves forward, the concrete is conveyed into the extrusion die — a steel form shaped to the curb profile. The machine moves continuously at a controlled speed (typically 3–8 feet per minute), and the shaped concrete is left standing immediately behind the die.
What makes this work: The concrete mix for slipform extrusion is deliberately stiff — much stiffer than a standard concrete mix. It must be workable enough to form through the die but stiff enough to stand without slumping immediately after the die passes.
Production rate: A slipform paver can produce 500–2,000 linear feet of curb per hour — dramatically faster than any cast-in-place method. On large highway or airport projects, this efficiency is the primary justification for the equipment investment.
When Extruded Curb Is Specified
- Major road construction and highway projects
- Airport perimeter roads and taxiways
- Large parking lot developments (shopping centres, distribution facilities)
- Any project where thousands of linear feet of continuous curb are required
- Rehabilitation projects where the existing road is being reconstructed with new curb
Limitations of extruded curb:
- Changes in direction require either pre-curved sections or saw-cutting and reforming the extruded curb
- Access for driveway approaches requires cutting out sections — slightly less clean than cast-in-place drops
- The machine has a minimum radius of curvature it can negotiate — tight curves may require cast-in-place sections
- Higher equipment cost than cast-in-place — only economical on large projects
Concrete specification for extruded curb: Typically 4,500 PSI minimum, low water-cement ratio (0.38–0.44), maximum 3/8-inch aggregate, and sometimes with a set-retarding admixture to allow the machine adequate working time in hot weather. The stiff mix makes slipform concrete among the most demanding to batch correctly.
Precast Concrete Curb
Precast concrete curb sections are manufactured in a factory environment, cured, and delivered to the project site for installation. Individual sections are typically 6–10 feet long and are placed end-to-end with a mortar or sealant joint.
Precast vs. Cast-in-Place
| Factor | Precast Curb | Cast-in-Place Curb |
|---|---|---|
| Quality control | Factory-controlled | Site-variable |
| Production rate | High (pre-made inventory) | Slower on site |
| Dimensional consistency | Excellent | Good |
| Curved sections | Requires curved moulds | Can form any curve |
| Small quantities | Economical | More economical |
| Large quantities | Very economical | Competitive |
| Immediate load capacity | Yes (pre-cured) | 24–48 hour wait |
| Replacement | Easy — section-by-section | More disruptive |
When Precast Makes Sense
Parking lot construction: Parking lot perimeter and interior curbs are among the most common precast curb applications. Standard curb sections can be placed quickly with a small crew, and the consistent quality reduces long-term maintenance. Most commercial parking lot curbs in the US are precast.
Replacement and repair: When individual sections of existing curb are damaged, precast replacement sections can be installed section-by-section without disrupting the adjacent curb. Cast-in-place repair would require cutting and reforming — more disruptive and less consistent.
Small isolated projects: When only a short run of curb is needed — a driveway approach, a small parking area — ordering precast sections eliminates the formwork and curing time of cast-in-place while avoiding the equipment cost of a slipform machine.
Landscape and Decorative Concrete Curbing
Not all concrete curbs are road infrastructure. Landscape curbing — concrete edging used in gardens, lawn borders, and decorative landscaping — uses the same basic material and forming principles but serves an entirely different purpose.
Extruded Landscape Curbing
Landscape curbing is typically formed by small, walk-behind concrete extrusion machines that produce a continuous border of shaped concrete directly on the ground. The operator walks slowly alongside the machine as it extrudes the profile.
Common profile shapes:
- Slant (angled face) — most common, works for most landscape applications
- Mower’s edge (flat-topped) — allows lawnmower wheels to ride on the curb
- Serpentine (curved-face) — decorative, more elaborate profile
- Victorian (scalloped) — ornamental garden style
Typical dimensions: 4–6 inches tall, 4–5 inches wide at the base, 2–3 inches at the top. The concrete is coloured integrally and sometimes stamped or textured on the face before it sets.
Applications: Flower bed borders, lawn edging, tree ring edging, driveway borders, garden path definition. The goal is to create a clean separation between lawn and planting areas that requires no maintenance and resists lawn mower damage.
Stamped and Colored Curbing
Decorative landscape curbing can be stamped with patterns — brick, cobblestone, flagstone — and coloured with integral pigments or acid stain to create a visually coordinated garden border.
For more on decorative concrete surface options including stamped patterns and colour methods, see our complete guide on types of stamped concrete — many of the same finish techniques apply to decorative landscape curbing.
Concrete Curb by Application
Highway and Arterial Road Curbs
Highway curbs — where they exist at all — are typically barrier profile with 6-inch reveal. Many highway sections use open drainage rather than curbed edges, particularly in rural areas where right-of-way allows roadside swales.
Where urban highways and expressways use curbed edges, the specification is typically:
- Concrete: 4,500 PSI minimum, air-entrained
- Profile: Barrier or high-back
- Reinforcement: As specified by state DOT
- Construction: Slipform machine for continuous sections
Residential Street Curbs
Residential streets typically use one of two approaches:
- Monolithic curb and gutter with 6-inch barrier profile — the standard in most US subdivisions
- Mountable curb for low-speed streets where driveway crossing frequency is high
The choice is often made by the local municipality’s standard drawings — residential street curb type is frequently mandated by local code rather than left to the developer.
Parking Lot Curbs
Commercial parking lots use a range of curb types:
Perimeter barrier curbs: 6-inch barrier profile at parking lot edges adjacent to traffic lanes — prevents vehicles from departing the lot over the curb edge.
Interior wheel stops: Sometimes precast concrete wheel stops are used in lieu of curbs at individual parking stall ends — these are not technically curbs but serve a similar containment function.
Island curbs: The curbs surrounding landscape islands within parking lots are typically 6-inch barrier profile precast sections, set on a prepared base with mastic joint sealant.
Driveway Approach Curbs
Where a driveway crosses the road curb line, the curb must be transitioned from full-height barrier or mountable profile to a depressed section that allows vehicle crossing.
Standard driveway approach:
- The curb is depressed at the driveway centre to near-road-surface level
- Transition sections (flares) on each side bring the curb from full height to depressed over a distance of typically 5–10 feet
- The radius at the curb return (where driveway meets road curb) is typically 5–15 feet depending on the municipality standard
The concrete at driveway approaches must be continuously reinforced through the transition — the geometry changes impose flexural stresses that unreinforced concrete cannot reliably handle.
Curb Mix Design and Concrete Specification
Concrete curbs are exposed to some of the most aggressive conditions of any concrete element — vehicle impact, freeze-thaw cycling, deicer chemical attack, and abrasion from tyre contact. The mix specification must reflect this.
Minimum concrete specification for residential street curbs:
- Compressive strength: 4,000 PSI at 28 days
- Air entrainment: 5–7% in freeze-thaw climates (non-negotiable in northern US)
- Maximum water-cement ratio: 0.45
- Maximum aggregate size: 3/4 inch for cast-in-place, 3/8 inch for slipform extrusion
Minimum specification for highway and high-traffic curbs:
- Compressive strength: 4,500 PSI minimum
- Air entrainment: 5–7%
- Maximum water-cement ratio: 0.40
- Supplementary cementitious materials: fly ash (15–25%) or slag (25–50%) permitted and encouraged for durability
Reinforcement: Most road curbs in the US use continuous longitudinal reinforcement — typically one or two #4 bars running the full length, at mid-depth of the curb. State DOT standard drawings specify reinforcement in detail; local municipality standards govern residential curbs.
According to the American Association of State Highway and Transportation Officials (AASHTO), curb and gutter concrete must meet specific freeze-thaw durability requirements — particularly in states with significant winter deicer use — because chloride ion penetration from deicing salts is the primary long-term durability concern for road edge concrete.
How Concrete Curbs Are Installed
Cast-in-Place Method
Cast-in-place curb is formed with steel or timber forms set to the curb profile, poured with concrete, finished, and stripped after sufficient curing.
Step-by-step:
- Subbase preparation: Compact the base course to the specified density. The curb sits on a prepared aggregate base — typically 4–6 inches of compacted crushed stone.
- Form setting: Set steel or timber forms to the curb line alignment and grade. Forms must be staked securely to resist the pressure of wet concrete. Grade pins or laser level set the top of form elevation.
- Reinforcement placement: Position longitudinal bars at the specified cover depth. Use bar chairs or dobies to maintain cover.
- Concrete placement: Pour concrete into forms. Rod or vibrate to consolidate. Fill forms completely without voids.
- Finishing: Trowel the top of the curb to the specified profile. Brush the face if a textured finish is required.
- Jointing: Tooled or saw-cut control joints at 10–15 foot spacing — essential for crack control in curbs which have very limited cross-section to absorb shrinkage stresses.
- Curing: Apply curing compound immediately after finishing. Allow minimum 24 hours before form stripping. Traffic loading: minimum 72 hours.
- Form stripping: Remove forms carefully to avoid chipping curb edges — particularly important for the top arris (sharp top edge).
Slipform Machine Method
Step-by-step:
- Subbase preparation: Same as cast-in-place — compacted aggregate base to specification.
- Machine setup: Position the slipform paver. Install the correct die for the specified curb profile. Set the grade control system (typically laser-guided grade control from a reference laser).
- Concrete delivery: Ready mix trucks deliver directly to the paver’s hopper. The mix must meet the stiff slump specification (typically 1–2 inch slump for extrusion).
- Continuous pass: The machine moves forward continuously at 3–8 feet per minute. An operator monitors alignment and grade; a second operator follows immediately behind checking the fresh concrete quality.
- Driveway openings: The machine stops and the fresh concrete is removed at driveway locations. Drop sections are either hand-formed or cut in after curing.
- Jointing: Control joints are tooled or sawed at 10–15 foot spacing within a few hours of extrusion.
- Curing: Curing compound applied immediately after the machine passes. Critical in hot weather — the exposed surface area of extruded curb is large relative to its cross-section, and rapid moisture loss causes surface cracking.
Concrete Curb Cost Guide
Curb cost varies significantly with project type, quantity, location, and installation method.
| Curb Type | Unit Cost Range | Notes |
|---|---|---|
| Cast-in-place barrier curb | $25–$50 per linear foot | Residential, small commercial |
| Cast-in-place curb and gutter | $35–$75 per linear foot | Includes gutter pan |
| Slipform extruded curb | $15–$35 per linear foot | Large projects only — low unit cost at scale |
| Precast curb sections | $20–$45 per linear foot | Installed cost including labour |
| ADA curb ramp | $1,500–$4,000 per ramp | Includes detectable warning surface |
| Landscape extruded curbing | $8–$20 per linear foot | Garden/landscaping applications |
What drives cost:
- Mobilisation — getting equipment and crew to site. For small jobs under 100 linear feet, mobilisation cost dominates.
- Subbase preparation — if the existing base is inadequate, excavation and recompaction add significant cost.
- Reinforcement — specified reinforcement adds $3–$8 per linear foot.
- ADA compliance — drop curbs and detectable warning surfaces add cost but are legally required.
Worked Example — Residential Subdivision Street: A new residential street, 500 linear feet of monolithic curb and gutter on both sides = 1,000 linear feet total.
| Item | Quantity | Unit Cost | Total |
|---|---|---|---|
| Subbase preparation | 1,000 LF | $5/LF | $5,000 |
| Concrete curb and gutter | 1,000 LF | $55/LF | $55,000 |
| ADA curb ramps (4 intersections) | 8 ramps | $2,500 each | $20,000 |
| Control joint sealing | 1,000 LF | $2/LF | $2,000 |
| Total | $82,000 |
At $82 per linear foot including all items, this is a realistic mid-range cost for residential street curb and gutter in a moderate-cost US market.
Frequently Asked Questions
What are the types of concrete curbs?
The main types are barrier curb (vertical, 6-inch face — prevents vehicle mounting), mountable curb (rolled or sloped face — allows vehicle crossing), monolithic curb and gutter (combined drainage section), valley gutter (depressed cross-drain), drop curb/ADA curb cut (accessible pedestrian crossing), extruded/slipform curb (machine-formed continuous section), precast concrete curb (factory-made sections), and landscape/decorative curbing (garden and property borders).
What is the difference between a barrier curb and a mountable curb?
A barrier curb has a near-vertical face of 6–8 inches — vehicles cannot cross it without significant damage. A mountable curb has a sloped or curved face of 3–4 inches reveal — vehicles can cross it without damage. Barrier curbs are used where pedestrian protection is critical; mountable curbs are used in residential areas and locations where vehicle crossings are frequent.
What is a monolithic curb and gutter?
A monolithic curb and gutter is a single continuous concrete section that incorporates both the curb (the raised vertical element) and the gutter pan (the flat drainage channel at the base of the curb) in one pour. Casting them together eliminates the joint that would otherwise form between separate elements, producing a stronger and more durable road edge section.
What is an extruded concrete curb?
An extruded curb (also called slipform curb) is formed by a machine that moves continuously along the road edge, forming the curb shape through a steel die as it travels. The concrete is stiff enough to stand immediately after the machine passes. Slipform extrusion is far faster than cast-in-place methods and is used on large road and highway projects.
What concrete mix is used for curbs?
Road curbs require minimum 4,000 PSI concrete with air entrainment (5–7% in freeze-thaw climates). Maximum water-cement ratio of 0.45 for residential, 0.40 for highway applications. Maximum aggregate size 3/4 inch for cast-in-place, 3/8 inch for slipform extrusion. These specifications ensure durability against freeze-thaw cycling and deicer chemical attack.
What are ADA requirements for concrete curb ramps?
ADA curb ramps must have maximum running slope of 1:12 (8.33%), maximum cross slope of 1:48 (2.08%), minimum width of 60 inches, a level landing at the top (60″×60″ minimum, max 2% any direction), and detectable warning surface (truncated dome field) at the road edge. Compliance is legally required at all pedestrian crossings on federally funded projects and broadly required by state and local codes.
How much does a concrete curb cost per linear foot?
Cast-in-place barrier curb: $25–$50 per linear foot. Monolithic curb and gutter: $35–$75 per linear foot. Precast curb sections installed: $20–$45 per linear foot. Slipform extruded curb on large projects: $15–$35 per linear foot. ADA curb ramps: $1,500–$4,000 per ramp. Landscape extruded curbing: $8–$20 per linear foot.
What is the difference between a curb and a valley gutter?
A curb is a raised element at the road edge that channels water along the road edge. A valley gutter is a depressed section — often at a low point or road crossing — that directs water transversely across the pavement to a central drain or low point. Valley gutters are essentially drainage crossings; curbs are drainage channels along the edge.
Conclusion
Concrete curbs are one of the most specification-sensitive elements in civil and residential construction — the right choice depends on traffic volume, vehicle speed, pedestrian access needs, drainage requirements, ADA compliance obligations, and project scale. Barrier curbs protect people. Mountable curbs provide access flexibility. Monolithic curb-and-gutter sections manage road drainage efficiently. Valley gutters solve low-point drainage problems. Drop curbs make pedestrian infrastructure accessible. Extruded curbs make large-scale road construction economical. Precast sections make parking lot installation fast and consistent. Landscape curbing makes property borders maintenance-free for decades. For any concrete curb project, calculate your concrete volume accurately using the ConcreteCal free concrete calculator — and for a deeper understanding of the wider concrete types context, see our complete types of concrete guide.